Category Archives: Craftsy

Watercolor with Copics, a tutorial

Hi all.  🙂

Today I have sweet Flower Maiden 2 by A Day for Daisies “watercolored” using Copics.

WC-Final2

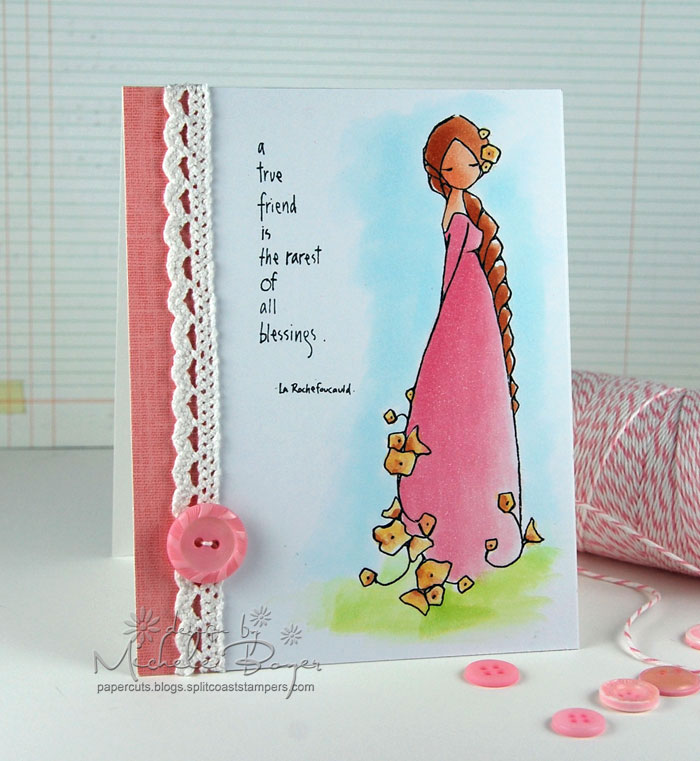
The watercolor look is easy to achieve with Copics and Colorless Blender.  You can use the markers themselves scribbled onto a palette or acetate, or you can use Copic refills, otherwise known as Various Ink. I prefer to use Various Ink.

You can find a complete step-by-step tutorial on the Craftsy blog HERE.  I hope you’ll check it out. 🙂

WC-Final-CU

Thanks so much for visiting! Have a great day!

1amichele siggy

Three Fast & Fun Birthday Cards (with tutorials)

Hi everyone! I have three birthday cards to share today, one cute and quirky, one bright and cheery and one just plain cute.  🙂

You can find step-by-step instructions with complete supply lists for each here:

3 Fast & Fun Homemade Birthday Card Tutorials

First I combined a couple different stamp sets, sentiments and dies to create this cute chick on a wire.  🙂

Michele Boyer - Paper Smooches

I used bright white X-Press It Blending Card for the background and Copic marker coloring of the chick.

Michele Boyer - Paper Smooches

Next I created a fun/festive card by embossing a background stamp then sponging over with bright inks.

Michele Boyer - My Favorite Things

I used coordinating colors to brighten the sentiment as well.

Michele Boyer - My Favorite Things

Lastly, I have a cute little 3-d cupcake with a bit of patterned paper.

Michele Boyer - Paper Smooches

Don’t forget the sprinkles!  🙂

Michele Boyer - Paper Smooches

Again, you can find a complete list of supplies and instructions on the Craftsy website following the link below:

3 FAST & FUN HOMEMADE BIRTHDAY CARD TUTORIALS

Thanks so much for stopping by!

Copics on Kraft, a tutorial

Hi everyone!  I’ve just returned from a fabulous vacation where I had lots of time to relax, reflect and refresh. Everyone needs to get away from time to time.  For me, the timing was perfect. 🙂

On the Craftsy Blog today I have a tutorial for coloring with Copics on Kraft.  I used Blossoming Buds by Paper Smooches.

Copic-Kraft-Final-PS-WM


I hope you’ll check it out.  🙂

Joyous Easter Wishes and Blessings

Just in case you’re looking for a few quick, last minute Easter card ideas, I have three featured on the Craftsy Blog today.

Trio

Thanks for checking it out.  🙂

Emboss Resist, A Craftsy Post

Hi everyone!  I have an emboss resist tutorial on the Craftsy blog today.

Finished-cardI used Botanicals 1 and Salutations by Paper Smooches along with Linen Background, inks and card stock by My Favorite Things.

Finished-CUYou can see the step-by-step process here.  Thanks for checking it out! 🙂

Thank You for Your Kindess

Hey everyone!  I’m back on the Craftsy blog today with a tutorial for creating acetate cards.

Final-with-MFT-wm-500

I used MFT‘s Floral Fusion Cover-Up and Lisa Johnson’s Words of Inspiration.  Two of my faves!

Final-CU-with-MFT-wm

It’s easier than you think!

Thanks for looking!  🙂

Shaving Cream Oceans and Roses

Hi everyone! I’m squeezing in another Craftsy tutorial today. This time I’m revisiting the shaving cream technique.  Actually, I had never used this technique until writing THIS tutorial. It was fun!

I have one card with the more common swirled or marbled effect and on my second card I was able to create a pattern of roses.  Squeee! I  love how it turned out!  And I love that it’s “different.”   🙂

First I used Surf & Turf by Paper Smooches.

1-Final-Hey-Gillfriend650R2

My seahorse (colored with Copic markers) is surrounded by an ocean of swirly blue… and a tiny bit of green.  (The pearls were colored using a Copic marker.)

1-Final-Hey-Gillfriend-CU-500R

And then…the roses!  The sentiment is from Pretty Phrases also by Paper Smooches.

2-Final-thanks-so-much-650R

Here’s a close-up:

2-Final-thanks-so-much-CU-650

You can find my step-by-step tutorial for both cards HERE.

Thanks for looking!  🙂

Additional supplies/info:  Copic markers (BG13, R83, Y21), Darice gold Sparkle Tape (from Five & Below).  Gill-Friend card 4 1/4″ x 4 1/4″; Thanks card 4 1/4″ x 5 1/2″.


smile (tutorial)

Hi everyone!  I have a new tutorial on the Craftsy blog today, this time demonstrating a stacked sentiment technique.  You can find the tutorial HERE.

Final-MFT-WM-500The flowers were stamped using Embellished Eggs (with “friend” from Fall Foliage) by My Favorite Things.  Letters were die-cut with By the Letters Lowercase Die-namics.

close-up-with-wm

To finish the inside, I stamped a few more flowers and a sentiment from Smile stamp set.

Final-Inside-MFT-WM

Thanks for checking it out (here)!  🙂

Baby Congrats – Tutorial

Hi everyone!  I have another tutorial on the Craftsy blog today.  I’ve added a simple twist to a double pocket card.  Hope you’ll check it out (here).  🙂

Congrats-MFT-WM-500

I used Lisa Johnson’s cute Beautiful Baby stamp set with coordinating dies along with Gingham Background by My Favorite Things.

The elephant is popped up on clear foam squares to add just a bit of dimension.

Congrats-CU-MFT-WMThe inside holds two surprise pockets for gift cards, a personal note, photos, etc.

Congrats-In-MFT-WM

Find out how to create your own hidden pocket card here.

Thanks for visiting!  🙂

Finished card size 5″ x 5″.

Thanks for Your Kindness

Hi everyone!  Just want to let you know I have a second Copic blending tutorial on the Craftsy blog today (here).

Michele Boyer/A Day for Daisies

I used four different types of blending to color Bitsy Bug Dot digi-image from A Day for Daisies.

Michele Boyer/A Day for Daisies

I hope you’ll check it out (here).  Thanks!