Monthly Archives: May 2015

j st to let yo know. I miss yo .

It’s Bellarific Friday and you know what that means!  It’s time for another challenge with Stamping Bella! This week we had a sketch (which I actually did follow this time).  🙂

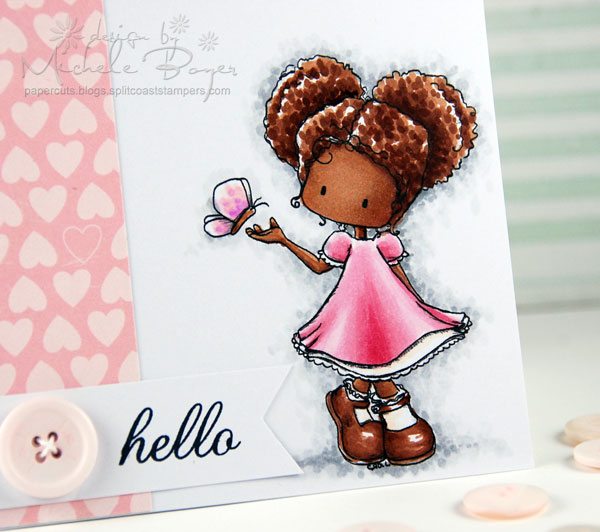
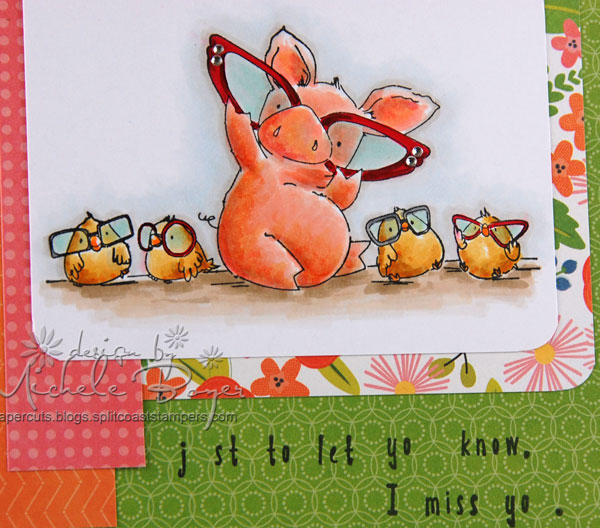
I used Nice to SEE You Petunia, stamped onto X-Press It Blending Card and colored with Copic markers.

Just-to-Let-You-Know

To shade Petunia, I used a bit of Pointillism.  (You can find a tutorial using that technique HERE).

After coloring Petunia’s glasses, I added two tiny clear rhinestones to each corner. 🙂

Just-to-Let-You-Know-CU

Next week’s challenge is “anything goes” which means “do whatever you’d like.” Just be sure to use a current Stamping Bella image, email your card to Emily by next Thursday and you’ll be entered to win some Bella Bucks!  (All challenge details can be found HERE.)

You can find more DT samples using last week’s sketch on the Stamping Bella blog (a little later this morning).

Thanks for stopping by! Have a great day!

1amichele siggy 

Additional supplies/info:  Copic markers (R01, R02, Y21, YR16, YR20, YR21, YR23, E40, E41, E43, BG10, BG70, R29, R39, R59, W00, W1, N5)  Finished size 4 3/4″ x 4 3/4″.

hello (Pointillism, a tutorial)

Pointillism is one of my favorite techniques for adding texture. It’s perfect for coloring curly hair and fur, and it’s even great for creating depth and shadow.  Pointillism can be used to color part of an image or even an entire image.

Finished-

In a nutshell, dots of varying size and color are used to create texture and dimension.  Here I used pointillism and Copic markers to color curly hair and add shadow around digi image Faythe Flies by Tiddly inks.

Finished-CU2

You can find a complete step-by step, start to finish tutorial using this technique HERE on the Craftsy blog.  If you haven’t already tried it, I hope you will!  Once you “get the hang of it,” it’s pretty quick and actually pretty easy too. Be sure to let me know!  🙂

1amichele siggy

Additional supplies/info: Copic markers (N0, N1, N3, E23, E25, E27, E29, R02, R81, R83, R85, E50, V04, Colorless Blender). Finished size 4 1/4″ x 5 1/2″.

New Stamping Bella – Tiny Townies and a Chance to Win!

Hi everyone! I’m so excited to be sharing a sample using one of the latest from Stamping Bella.  New Tiny Townies will be available June 1st, along with some other amazing images!  Exciting, right?  I think so!

This is Blossom Loves Balloons.  I love her.  ♥♥♥

Birthday-Girl

After stamping onto X-Press It Blending Card and coloring with Copic markers, I used a scalloped die-cut strip as a stencil to sponge in the sky around her.

Birthday-GirlCU

Would you like a chance to WIN Blossom Loves Balloons?  Leave a comment HERE on the Stamping Bella blog.  On that post you will also find a bit of Stamping Bella history and more samples using this cutie patootie.  🙂

Thanks for stopping by!

1amichele siggy

Copics used:  E00, E11, E31, E35, E50, E53, R01, R81, R83, Y21, YG06, YG09, C00, C1.  Finished size 4 1/4″ x  5 1/2″.

Welcome Home

Hi everyone.  🙂

I have a quick welcome home card to share today.  I thought it would work well for a soldier. The colors are basically patriotic with a bit of a country feel.

Welcome-Home-475

I used Welcome Word Die with The Welcome Wagon stamp set by Paper Smooches. Once the welcome word was die-cut, I colored it with a Copic marker to match the blue in the paper (from October Afternoon’s Sasparilla).

Welcome-Home-CU

Thanks for visiting today.  I’ll be back soon.  🙂

1amichele siggy

Not to get carried away…

Hi everyone.  I had some extra time yesterday so I played a bit with Unforgettable (stamps and dies) by WPlus9. This little elephant has won a place in my heart.  🙂

Not-to-Get-Carried-Away2

On a block of X-Press It Blending Card, I sponged a cloudy sky using one of Paper Smooches Waves dies. The elephant was die-cut from blending card and colored with Copics. He’s adhered with this tail to the paper and his body popped up on foam tape.

Not-to-Get-Carried-AwayCU2

That’s it.  Short and sweet.  🙂

Thanks for stopping by! I’ll be back soon!

1amichele siggy 

Copics:  C00, C1, C3, R00.  Finished size 4 1/4″ x 5 1/2″

enjoy

Hi everyone!  Welcome to another Bellarific Friday with Stamping Bella!

This week’s challenge was to create a one layer card.  I used Uptown Girl Isabelle Loves her Ice Cream. (I think my daughter is related to her.)

enjoy-Michele0515

Since I used Copics, I stamped onto X-Press It Blending Card, colored, attached my tiny flag strips and button, then attached the entire panel to a white card base. Visually, it is a one layer card so I’m calling myself “compliant.”  haha. There are no hard set rules.  However you are inspired…

enjoy-Michele0515-CU

Next week’s challenge is a sketch:

may-22 sketch

You can check out more one layer cards by the DT on the Stamping Bella blog (a little later this morning).

If you’d like to play along, use a current Stamping Bella image, email your card to Emily by next Thursday and you’ll be entered to win some Bella Bucks!  (All challenge details can be found HERE.)

Thanks for stopping by! Have a great day!

1amichele siggy

Copics used: E00, E11, BV000, R01, Y21, E29, E31, E33, E35, E40, E42, E50, E53, R81, R83, R85, YG11, YG13, C00, C1, C3.  Finished size 4 1/4″ x 5 1/2″.


Your Love Ties Us Together

Hi everyone. Just popping in to share another quick Father’s Day card with new Paper Smooches.

I used Daddy-Yo and Frame 3.

Your-Love-Ties-Us

After stamping the ties, I cut out each then added small designs using a white pen. The little gold x, die-cut from Stitched Dies, serves as a tie tack. (Actually, the white pen smeared a bit so I needed a way to cover the tiny mess.)  🙂

Cute sentiment, yes?

Your-Love-Ties-Us-CU

I love that Sudoku patterned paper.  I’m saving the second sheet for use on a card for my mother-in-law who loves those puzzles.  🙂

Thanks for visiting.  I’ll be back tomorrow with Bellarific Friday!

1amichele siggy 

You’re not ONE of a kind

Hi everyone.  It’s time for Stamping Bella!  This is actually another image I colored during the 30-day Copic challenge a few weeks ago (on Instagram).  I can’t let the images go to waste.

Youre-My-Favorite

I used Ramona and Her Wagon, paired with one of my (latest) fave patterned papers, Echo Park Simple Life.  As always, she’s stamped onto X-Press It Blending Card and colored with Copic markers.

Youre-My-FavoriteCU

I think Ramona and EP Simple Life are a perfect match.  ♥

Thanks so much for stopping by!

1amichele siggy 

Additional info:  Copic markers (E00, E11, Y21, E33, E35, E41, E42, E43, R24, R29, R59, BG13, BG18, W00, W1, W3, W5, W7). Finished size 4 1/2″ x 4 1/2″.

Happy (interactive) Father’s Day

Hi everyone!

My card today features a cute little Chubby Chum Pal bear from Paper Smooches, and guess what he’s doing? He’s wearing Daddy’s hat. Of course it’s too big for him.

Happy-Fathers-Day-Bear-600

And he’s playing peek-a-boo.

Happy-Fathers-Day-Bear-600-123

The hat swivels on a hidden brad. I used new Man Hat die with Pebbles Happy Day patterned paper. (I love the tiny feathers!)

Happy-Fathers-Day-Bear-600-CU

He was stamped onto X-Press It Blending Card and colored with Copic markers. The sentiment and pale mustaches around him are from Daddy-Yo stamp set.

Thanks for visiting today! I’ll be back tomorrow.  🙂

1amichele siggy

Additional info/supplies: Copic markers (E33, E35, E40, E41, E42, E43, R02, BG11, W00, W1, W3), brad.  Finished size 4 1/2″ x 4 1/2″.

DIY Magnetic Frame – a tutorial

I have a fun project to share today using Crate Paper‘s Confetti collection and a plain wood frame.  🙂  (Tutorial HERE.)

MF-Final-Lrg3-K

I hid a thin metal sheet behind the paper background so photos and/or keepsakes can quickly and easily be switched any time.

MF9-Magnets

Coordinating chipboard accents were used to create cute magnets to hold photos in place.

MF7 CU1

And Confetti dies were used to create big, beautiful layered flowers.

MF-Final-Collage3

For added versatility, I adhered a magnetic sheet to the back of an embellished pocket where additional photos, tickets or small flat keepsakes can be kept.

MF8 CU2

You can find a complete list of supplies as well as a step-by-step tutorial HERE on the Craftsy blog.

Thanks for stopping by! Have a great day!

1amichele siggy