Category Archives: Tutorials

A Kraftin’ Kimmie Challenge and a Button Wrap How-to

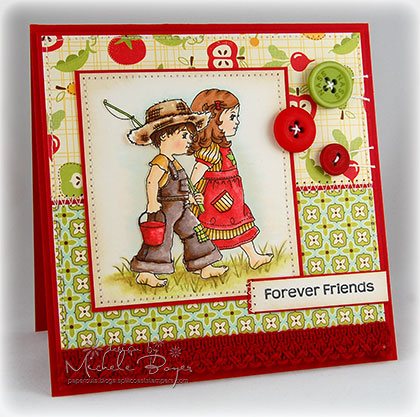
It’s Saturday and that means it’s time for a challenge with my Kraftin’ Kimmie friends (and stamps).  This week Vicki has us using two or more KK images to create a scene.  I decided to use the boy (minus the dog) and the girl (minus the wagon) from Kimmie’s latest release.

Forever Friends

   KKFFBG

It wasn’t difficult to omit the wagon from the Puppy Love image or the dog from the Gone Fishin’ image, but removing the dog leash was a bit KKFFCUtricky.  After inking the image, I soaked the tip of a pointed q-tip in baby wipe solution (pooled at the bottom of the wipes container) and then wiped away the leash lines from the stamp.  After stamping, I then drew back in the missing lines from the overalls and bucket handle using a fine tip black marker. 

To make things easier, the boy was stamped, colored and cut out, then adhered over the girl.  There was no way I was going to try to mask this.  (Plus I like that the ends of the boy’s hat are lifted a bit.)

Be sure to check out the other design team samples on Kimmie’s Challenge Blog HERE.  And if you’d like to play along, please post a link on the challenge blog and you’ll have a chance to win a free stamp from Kraftin’ Kimmie!

Button Wrap How-to

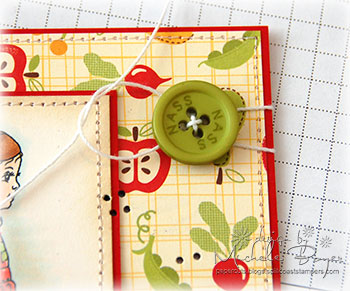
I’ve had quite a few requests to post a tutorial on how I tie string around my buttons as I’ve done on this card, so I took a few extra photos along the way to show you how I do that. It’s very easy.

     KKBW1KKBW1KKBW1

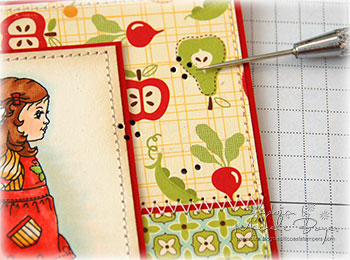
First I mark my button holes with either a pencil or the tip of a paper-piercer.  Punch through the marks with the piercer, inserting the piercer as far as it will go so the holes will be large enough to slip a large threaded needle through without tugging.

       KKBW2

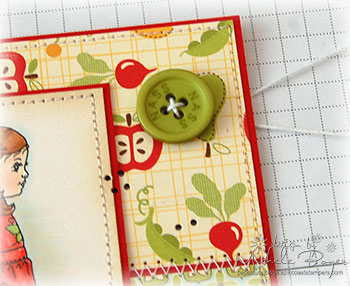
Beginning from the back, stitch your button to the card front, leaving the two long tails of string hanging behind.

     KKBW3

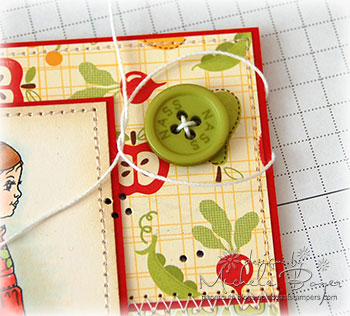
Bring the two ends from the back and begin tying the string around the button.   At this time you can adjust the distance between the two strings on the right side of the button.  Tie tightly once.

       KKBW4

And then tie again, knotting the string.  Use sharp scissors to nip off the ends of the strings just beneath the edge of the button.  Done.  🙂

Thanks so much for stopping by!  Have a great day!

StampsKraftin’ Kimmie“Puppy Love,” “Gone Fishin” and “Kimmie’s Everyday Sentiments”   Ink: Memento Tuxedo Black, VersaMagic Wheat   Cardstock: Stampin’ Up Real Red, Papertrey Ink Vintage Cream   Patterned Paper: October Afternoon Farm Fresh 8×8 paper pad   Accessories: Copic markers (E000, E00, E31, E33, E35, E50, E51, E57, E71, R14, R17, R20, YR31, Y17,YG03, YR0000, B0000), Prismacolor pencils, Maya Road crocheted trim, PTI buttons, white string, sewing machine, dimensional boosters, sponge.  Finished size 5” x 5”.

Pure Innocence Monday

Today the My Favorite Things design team is previewing a new line in the store, Pure Innocence.  I’ve been so eager to begin posting samples using these images.  I think this little girl is just the sweetest!   I love her no matter what she’s doing!  On Wednesday, November 4th, MFT is releasing FIVE Pure Innocence images.  And they are ALL totally adorable!

Birthday Girl

OFP

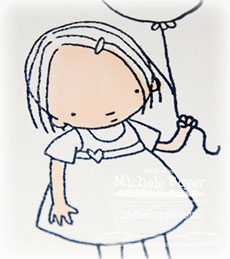
I’ve received many emails asking how I color faces so I took a few extra pictures as I colored this image.  Please know that I am not an expert and have never taken a Copic class.  I’ve just stumbled along the way, learning by trial and error and what I pick up from other designer blogs.   

MFTPI1I always color skin tone areas first.  That way, if I make a mistake, I’m not recoloring the entire image.  I find it easier to make corrections in other areas as opposed to faces.
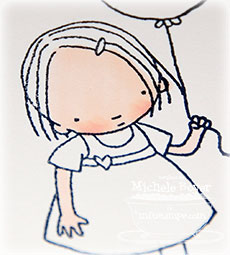
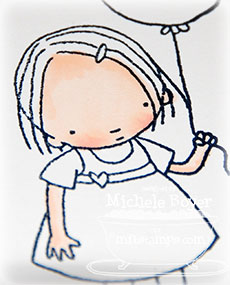
As a general rule, I use the same three basic Copics for skin tones — E000, E00 and R20. 

First I color the entire area with E000.  

.

MFTPI2

Next, I color the cheeks. 

I lightly touch the tip of my E000 marker to the R20 marker and begin applying the color to the cheek area.  If I have too much pink on the marker, I swipe the extra off onto scrap paper, then use E000 to blend in the pink.  

It’s best to apply just a bit of pink at a time as it’s easier to add than to take away.

MFTPI3The next step is to add a bit of shadow.
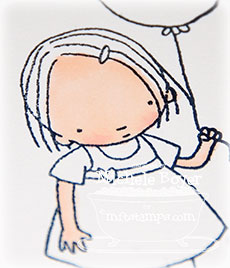
Using an E00 marker, I add a bit of color along the hairline and sides of her face. 

I use this marker to add a bit of darker color to necks, arms and legs as well.

It sometimes looks like this shadow color is too dark, but it will all blend together in the next step. 

.

MFTPI4Lastly, I color over the entire area at least once with the E000 marker.
Pretty easy (in my opinion…with these three markers…I’d be lost without them)!

Want to see more samples using the new Pure Innocence images?   Check these out:

Amy, Melody, Cindy, Frances, Susan, Kirsten, Natalie, Kathy,
 Jessie, Christina, JodyBarbara and Joanne.  (I think we all really like this new line!)

And yes, I realized (a little too late) that I adhered the cherry paper upside down.  Just thought I’d point that out before Eagle Eye (E.E.J.) makes a comment.  lol.  (She knows who she is.)

I’ll be back tomorrow with a preview of another new release.  Thanks so much for stopping by!  Have a great day!  🙂

Stamps:  MFT “My Balloon” (Pure Innocence)   Ink: Memento Tuxedo Black  Cardstock: Prism Crabapple Dark, MFT Perfect Paper Panel   Patterned Paper: Basic Grey Lemonade 6×6 paper pad   Accessories: Copic markers (E000, E00, R20, R81, R83, R85, E33, E35, YG23, Y21, B0000), Prismacolor pencils (grass/ground), Martha Stewart border punch, Spare Parts trim, Basic Grey button, cream jute string, dimensional boosters.  Finished size 4 ¼” x 5 ½”.

Another Digi-image and a few Q&A’s

I can’t seem to tear myself away from these sweet little girls by Digi Stamp Characters.  My friend, Jody, and I both purchased this image (among others…she blames me) and so we thought it might be fun if we both posted our cards on the same day.

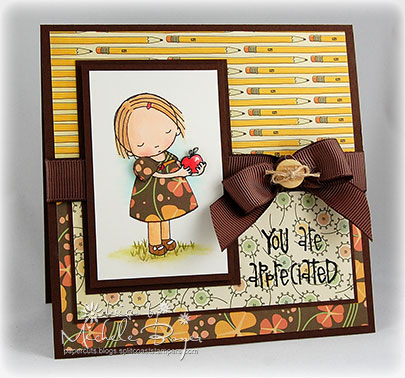
You are Appreciated

      PIYAA2

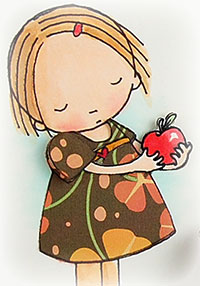
My little apple girl is colored with Copic markers, her dress and arms/apple were paper-pieced and the grass was colored/drawn in with Prismacolor pencils.

PIYAACUSome of you had some questions about using digi-images so I’ll try to answer them as best I can.  I’m no expert but I can share with you what I have and do.

My printer is a Canon MP240 Inkjet.  It was not expensive and I bought it with a rebate so it was a good deal. 

Copic markers work fabulously with the ink.  I’ve had no bleeding whatsoever… unless I use too much marker ink.   Rolling Eyes

I’ve had no problems running cardstock through my printer.  The paper does not travel/wrap around a bar of any kind so the paper comes out as flat as it went in.

It’s really easy to paper-piece digi-images:  

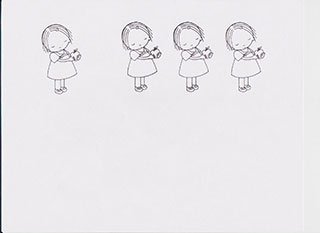
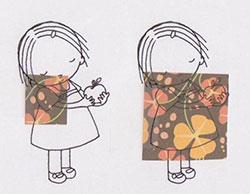
First decide how many different parts you will need.  I needed one for the main image, a second for her popped up sleeve, a third for her dress and a fourth for her right arm, apple and dress band.  So I printed four images onto one sheet of cardstock.  I left a little extra room around the first one which is the one I used for the card.  The others were printed close together since I only needed parts from each one.

                    AG1A001

After printing, I returned to my computer and deleted the first and fourth images.  Doing so prevents the printer from printing over these images a second time.  Remember, the first is the main image and the fourth I used for her arm, apple and dress band.

Using removable tape, I adhered small pieces of patterned paper over the area I wanted printed (the sleeve on the second image and the dress on the third).  Be sure to place the tape on the side of the patterned paper that will go into the printer first.

                      AGPPA

Here’s a close-up of the two images after printing a second time:

AGPPCUI then cut out the parts I needed and began putting her back together. 
I hope that was helpful.  I’d be happy to answer any other questions.  Just let me know!  🙂

Don’t forget to stop by JODY‘s blog to see her apple digi-girl!  I can’t wait to see for myself as she is a super-fantabulously talented gal!  (I’ll be pairing up with friends and images often as I’m on a mission to use my neglected supplies.  And everything is more fun with a friend.)  🙂

Thanks for stopping by!  Have a great day!

Digi-imageDigi Stamp Characters   Sentiment:  Cornish Heritage Farms “Making the Grade” (Kim Hughes Collection)   Ink:  Memento Tuxedo Black   Cardstock:  Prism Suede Brown Dark, Natural Smooth   Patterned Paper:  Cosmo Cricket “The Boyfriend” and “Earth Love” available here or here   Accessories:  Copic markers (E000, E00, E57, R20, YR20, YR23, R12, R14, G21, B0000), Prismacolor pencils/turpenoid, Stampin’ Up chocolate grosgrain, Basic Grey button, Bow Easy, natural jute string, clear embossing powder (sentiment).  Finished size 5” x 5”.

Trick or (a hidden little) Treat

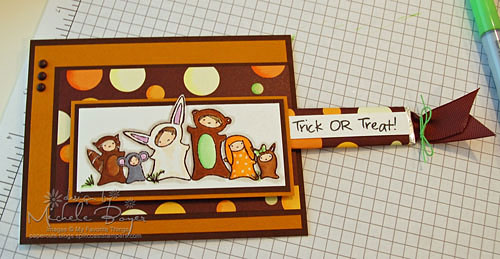
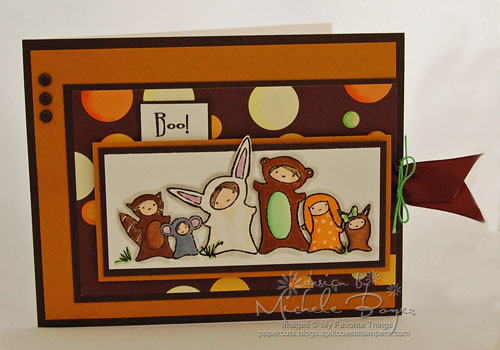
I just can’t seem to resist cute little Halloween images.  (It’s a weakness.)  This one is called Monster Squad, a new release by My Favorite Things.  Had to have it!!!

 TOTMFT500

I started out with the intention of making this another regular card, but just before I adhered the focal image, I thought, “Hmmm…. I think I’ll hide a little treat back here.” 

        TOTPOR

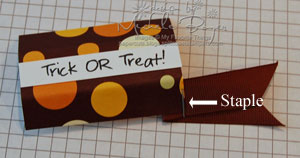
So here’s what I did…I cut a piece of 2 3/4″ x 2 1/8″ patterned paper to cover a stick of gum,  folded the paper around the gum just to get the fold lines, then unfolded the paper.  I cut a piece of chocolate ribbon, folded it in half and stapled it to one end of one side of the paper, like this:

                  TOTSR

I wrapped and adhered the paper around the stick of gum then tied some string around the ribbon.  Mine was white but I colored it with a green Copic. 

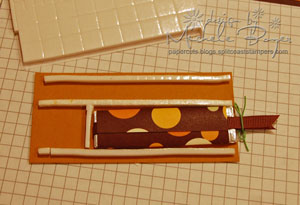
Next, I laid the wrapped gum on the back side of the focal image, aligning the edge of the gum with the edge of the matted piece.  (Be SURE the ribbon is sticking out on the right side.  Don’t ask me why I’m warning you to double check.  Rolling Eyes)  Leaving a tiny bit of space on each side of the gum, apply foam tape across the bottom, top and side of the gum and then across the bottom edge.  I used the border strip from my foam squares.  (Sorry for the bad picture. I took that one at night.)

                       TOTFT

Adhere that piece to your card front and slide in the gum.  (Don’t pay attention to that skinny brown ribbon.  I decided it was too small and added the wider ribbon instead.)

Thanks so much for stopping by!!  Have a great day!   

Cardstock:  Prism White (base), Suede Brown Dark, Sunflowers Dark, Super Smooth White   Patterned Paper:  Memory Box “Spooky” Collection 6×6   Stamps:  My Favorite Things “Monster Squad” and “Fright Night” (boo sentiment)   Ink:  Tsukineko Memento Tuxedo Black   Accessories:  Copic markers, brads (American Crafts), black marker, white string, chocolate grosgrain, foam tape.  Card size 5 ½” x 4 ¼”.

Belly Button Bling, Chapter 3

It’s time for another Dirty Dozen/Dirty Dozen Alumni challenge.  This time the focus is to use stamps designed by fellow Dirty Girls or as an alternate choice we could semi-case something by a fellow Dirty Girl .   The required element is to use a Spring color combination with a restriction of no diecut/embossing machines (i.e. Cuttlebug).  So I decided to use one of Lisa Strahl’s backgrounders from Cornish Heritage Farms and semi-case myself.

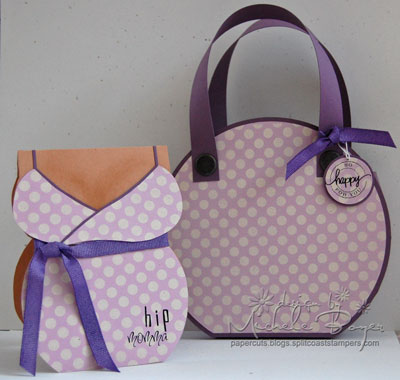
If you’re a member of the Splitcoast Fan Club, you may remember this card that I made in November 2005.  (You can only see it if you’re a Fan Club member.  If you’re not a Fan Club member, you can get details on joining here.)  So in this first card, my girl is wearing her little denim skirt, showing off her hip belly button bling.  Well, some time went by and she met this great dude, got married and sported this little number…which has, in turn, lead to this:

HMS1

Yes, she’s in the “family way.”  She’s still hip, but she’s had to put away the belly button bling…for a while, anyway. 

I followed the same premise as the lingerie card but added a lot more curves.

I thought it would be nice to have a matching gift bag to go along with the card so I made my own (nice and round… like her belly).  Here’s how I did it:

Cut two 6 1/2″ circles from the dark plum cardstock and two 6 1/4″ circles from the light plum cardstock.  I stamped the Large Polka Dot backgrounder using vanilla craft ink on the light plum circles.  (Since the circles were wider than the stamp, I used my stamp-a-ma-jig to line up the dots for the remaining part of the circle.)   Remove 1/2″ from the bottom of each circle and adhere the lighter pieces to the darker ones.

PSL1

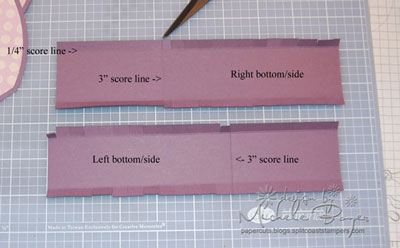
For the sides, cut two 8″ x 2″ strips of dark plum cardstock. Score in 1/4″ along each long side.  Score in 3″ from one short side on each piece.  From this 3″ score line, snip along the length of the strip, only going in as far as the 1/4″ score line.  (Don’t snip past the 3″ score line.)

.

.

PBGS1

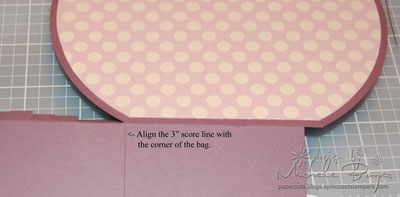
Adhere the first side piece, aligning the 3″ score line with the bottom corner of the bag.  Continue adhering up the side of the bag, bending the side piece to fit along the curve.

.

.

.

PBSS

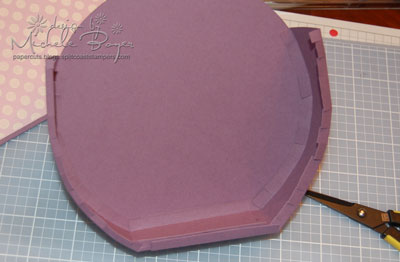
Begin adhering the second side, aligning the 3″ score line of the second strip with the other bottom corner of the bag,  overlapping the 3″ lengths of the strips on the bottom.

Apply glue (or your adhesive of choice–I use Tombow Mono Multi) to the exposed tabs and bottom edge and adhere the second side of the bag, aligning the edges with the curve of the side.  I poked my scissors down inside the bag to help with alignment.

For the handles, cut two 9 1/2″ x 3/4″ strips of dark plum cardstock.  Adhere each end to bag using big brads.

I can’t wait to see what the other DDG’s have created!  Click here to see.  Thanks so much for looking!!!  Have a great day!

Cardstock:  SU Creamy Caramel, Perfect Plum, Pale Plum   Ink:  SU Creamy Caramel and Vanilla craft   Stamp:  Large Polka Dot backgrounder by Cornish Heritage Farms   Rub-ons:  Deja Views ‘Congrats,’ One Heart One Mind ‘A Mother is…’ and Lil Davis Designs ‘Black Alphabet’   Accessories:  Karen Foster Biggie Brads, ribbon, Creative Memories Circle Cutter, 1 ¼” and 1 3/8” circle punches, pop dots, sponge.  Card size 4 ¼” x 5 ½”.

Spooky Delights Candy Bar Card

SD3

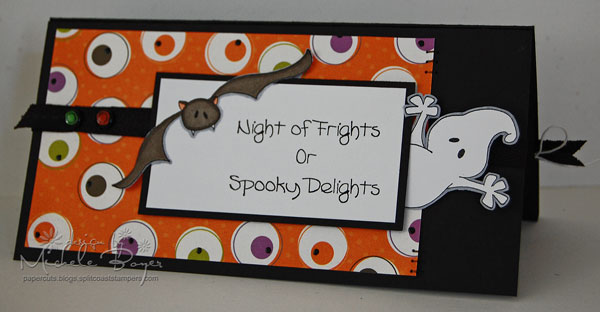
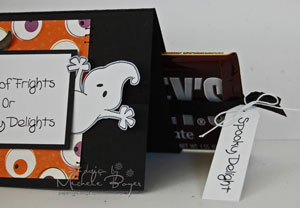
I had fun making this little candy bar card using C.C. Designs’ new Halloween set (available from All That Scraps)!   Where’s the candy bar?  It’s in a little pocket on the back side of the card.  I have some black twill tied around the bar with a little tag attached with white string.  You pull the twill and out comes the bar (and it’s FULL size! 🙂 ).  Here’s how I did it:

SDBCS

.

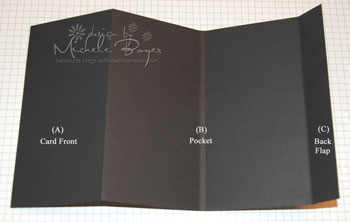
I cut the black cardstock to 6 1/2″ x 11″.  Score at 3 1/4″, 6 1/2″, 6 3/4″ and 10″; fold as shown.  Your cardstock will look like this …………………………………………………>

(mountain fold, valley fold, valley fold, valley fold)

.

.

GF2A

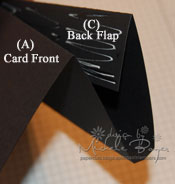
Fold the back flap (“C”) to the left toward the back (fold line) of the card front (“A”). 

Apply liquid glue or tacky tape to adhere the flap.  I used Tombow Mono Multi…………………………………………………………..>

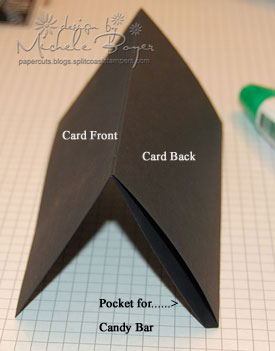
You now have your pocket for the candy bar.  If you’d like, you can punch a hole (through both layers of the “pocket”) along the right edge and thread ribbon through as described here.

.

.F1A

<………………..Your card should look like this. 

Now you can decorate your card any way you’d like. 

I chose this cool, shiny eyeball paper, adding some glossy black dots in each “eye” using a 3-d gel pen.  I stamped the bat and sentiment, trimming so that the bat’s wings come “out of the box.” 

The sentiment panel is raised on dimensionals, but before adhering it to the patterned paper, I tucked in the little ghost.  It just worked out that he can slide up and down as his tail is “hooked in” by the pop dot in the lower right corner.

.

CBO.

.

.

Tie twill and tag onto the candy bar and slide it in!…………………………………………………..>

.

.

SDTB.

.

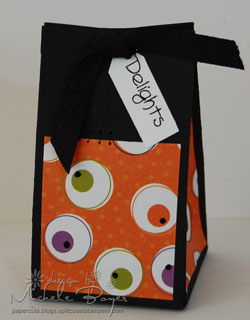
Lastly, I made this little 2-4-6-8 box for some more “spooky delights.”  I covered each side with small panels of eyeball paper, adding the black dots and a few stitches, then punched two holes through all layers, inserting and knotting the twill to close the box. 

Thanks for stopping by!  Have a great day!

Cardstock:  SU Black, Papertrey Ink white     Patterned Paper:  Reminisce “101 Eyeballs”     Stamps:  C.C. Designs Halloween set     Ink:  Brilliance Graphite Black     Accessories:  Copic markers, SU black marker, mat pack/needle, Sakura 3-d gel pen, black twill (source unknown), BoBunny Fright Night Bodacious brads, liquid glue, pop dots.  Finished card size  6 ½” x 3 ¼”.