Category Archives: Queen & Co.

Queen & Company’s New Shaker Kit is SO sweet!

Hi everyone! Today I’m sharing two more cards I created using Queen & Company’s latest kit, Candy Land. It’s packed with pre-cut foam to coordinate with the candy and candy jar dies, pre-cut acetate, paper pad, stamps, eleven bags of toppings, four fiber packs and a handy storage pocket to contain all the sweetness!

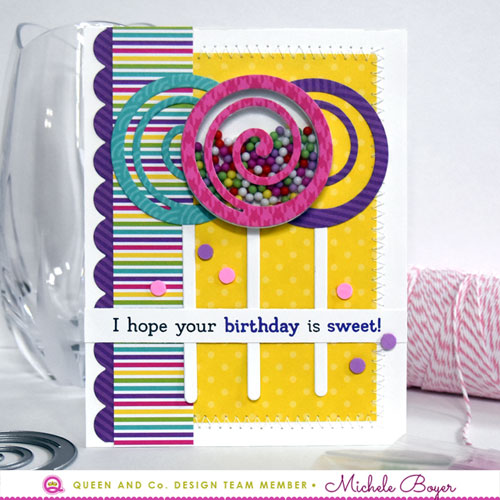
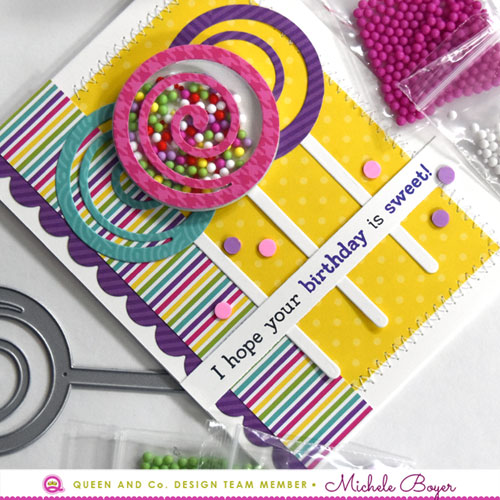
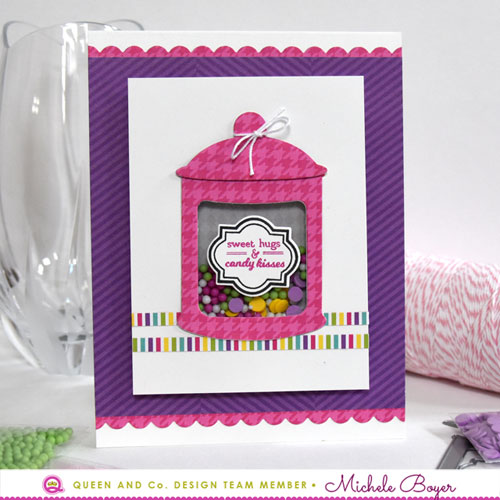
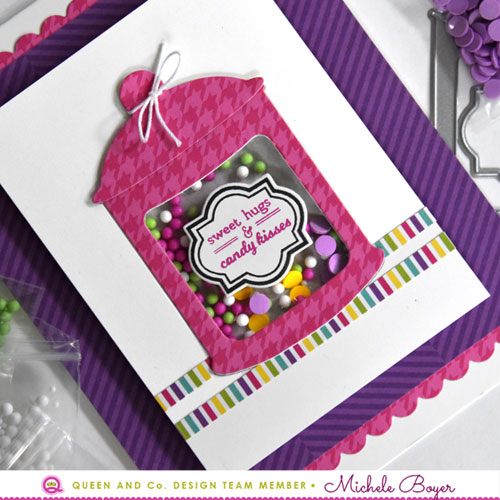
On my first card, I did something a little different and created a shaker that can be seen inside the card, like a little window of candy.

Hey-Sweetie-500

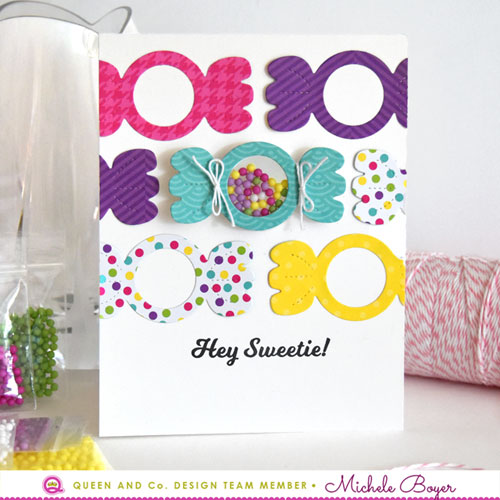
I used the candy die to cut shapes from several patterns in the Candy Land paper pad. I laid them out on my card front, adhering and trimming all but the one in the center. With the turquoise candy positioned in place (but not adhered), I lightly traced the inside of the circle with a pencil. I then used a slightly bigger circle die to die-cut an opening through the front of my card base. I adhered one of the pre-cut acetate shapes to the back of the card front covering the opening then adhered a white die-cut candy over the acetate. This creates a clean finish on the inside and provides a base for the toppings. (I highly recommend picking up a tube of Sheer Glue as I have found this to work best with acetate.)

Hey-Sweetie-CU-500

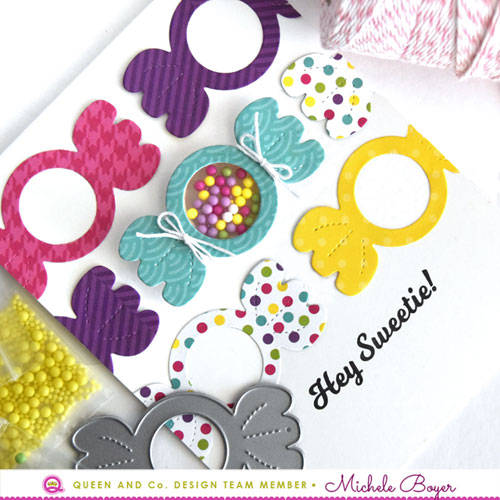
I then adhered the coordinating foam shape over the opening on the front of the card, filled with toppings and adhered a second pre-cut acetate circle. After adhering the turquoise die-cut over the shaker, I tied a bit of string around each side of the candy.

Supplies: Candy Land shaker kit, Sheer Glue

Next, I used the fun fibers included in the Candy Land kit to create two sticks of pink and blue cotton candy.

You-Make-Life-Sweeter-500

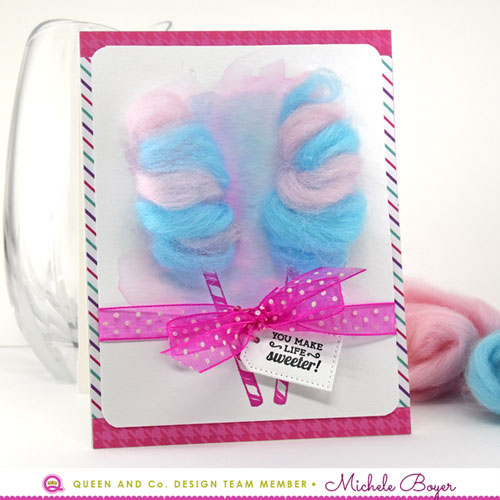
I first watercolored a bit in the background using pink and blue distress inks. Once dried, I stamped two candy sticks. I created longer sticks by first stamping the initial images. I then added a piece of clear removable tape across the bottom portion of the sticks, creating a mask. I aligned and stamped the additional impressions of each and removed the tape. The small bit of overlapping ink is covered by the ribbon.

You-Make-Life-Sweeter-CU-500

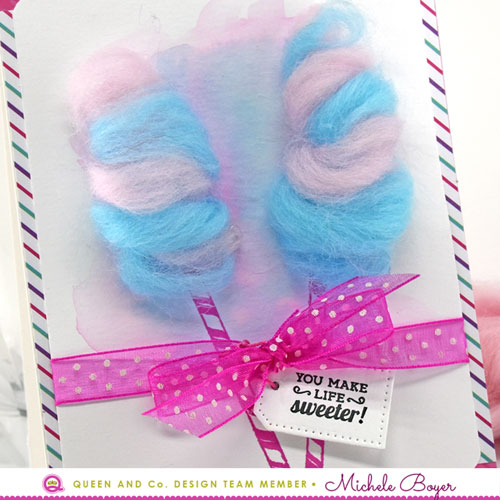
I pulled apart two thin pieces from the pink and blue fibers then rolled them together, pulling the fibers apart a bit in between the colors to sort of blend the two together. I used hot glue to attach each, shaping and tucking the fibers with a toothpick before the glue dried.

I stamped the sentiment then die-cut in a small tag shape and adhered to the ribbon with string (which I colored to match using a Copic marker).

Supplies: Candy Land shaker kit, Sheer Glue

Grab your Candy Land kit HERE. The Candy Land paper pad can be purchased separately HERE as well as foam and acetate refills HERE.

Thanks so much for stopping by!

1amichele siggy

LOVE you (queen & company)

Hi everyone. I wanted to do a bit of coloring for today’s The Daily Marker 30-day color challenge, but I didn’t have a lot of time. So I colored my favorite critter from Simon Says Stamp‘s Best Friends stamp set (I’m a bit obsessed with it at the moment) and placed him inside the LOVE foam front shaker kit from Queen & Company.

Queen & Company LOVE foam front/Simon Says Stamp Best Friends

It was super quick and easy. Inside the shaker, I placed paper from the Heart Throb paper pad along with Pops and Diamonds.

Queen & Company LOVE foam front/Simon Says Stamp Best Friends

Copic markers – E30, E31, E33, E35, E37

Before adhering the card front over the assembled shaker, I removed about 1/4″ from the top and bottom edges. I adhered two thin strips of plaid paper to the acetate on each end then added the card cover over top. Lastly, I die-cut and  adhered “you” from Word Dies 1.

Thanks for stopping by today!  I’ll be back tomorrow.  🙂

1amichele siggy

Queen & Company’s new Candy Land Shaker Kit

Hi crafty friends! Today I’m sharing two cards I created using a brand new kit from Queen & Company! (Coming soon!)  Candy Land is an adorable new kit packed with candy themed patterned paper, dies, pre-cut foam and acetate shapes, toppings, stamps and even fibers to create cotton candy! It’s totally adorable and perfect for sending sweet greetings and loads of birthday fun!

Birthday-Sweet-500

On my first card, I used the lollipop die to create a cute shaker filled with multi-colored candy dots. The kit includes five colors of dots, several of which have different sizes of candies. (Some are teeny, teeny tiny.  So cute!)

Birthday-Sweet-CU-500

After die-cutting the lollipop shape from three patterned papers, I trimmed away the sticks and replaced each with white die-cut sticks. Once the front panel was assembled, I added a bit of stitching as well as a scattering of pink and purple confetti toppings.  (There are six different colors of round confetti in the kit!) The sentiment was stamped in black with the words “birthday” and “sweet” stamped in purple.

To finish my card, I cut another panel of white card stock slightly smaller than the card front and adhered inside to hide the stitching.

Supplies:  Candy Land Shaker Kit, Scrap Happy Sheer Glue

Sweet-Hugs-500

Next, I used one of the two candy jar dies to create a Sweet Hugs card. I placed the foam shape on the back so the jar is flush with the surrounding white card stock.

Sweet-Hugs-CU-500

Inside the shaker, I placed an assortment of flat confetti and round dots then added a die-cut label/sentiment over the acetate.

Tip: To create level support around the foam shaker, trim and apply pieces of the leftover foam (from inside the shaker shape) around the back edges of the shaker panel.

Supplies:  Candy Land Shaker Kit, Scrap Happy Sheer Glue

The Candy Land Kit is so much fun! I’m certain it will be a big hit!  🙂

Thanks so much for stopping today!

1amichele siggy

Thanks a Bunch (Queen & Company)

Hi everyone! Happy New Year!  I hope your evening was fun and safe. I was safely wrapped in a blanket on the couch watching tv.  🙂

Today I’m sharing two cards using my favorite Queen & Company kit, Heart Throb.  I love the color scheme and small patterns in the paper pad as well as the tiny heart toppings.

Thanks-a-Bunch-500

My first card uses the Lines Foam Front Shaker Kit in addition to the Heart Throb kit. As I’ve mentioned before, the foam kits are so easy and quick!

Before adhering Lines foam shape, I adhered to the card front a panel of dotted paper so the dots show through the shaker windows. I filled the openings with the tiny hearts included in the kit as well as Diamonds and Posies.  The acetate was added then topped with a panel of heart paper die-cut using the Lines Foam Front Die.

Thanks-a-Bunch-CU-500

I die-cut the heart and thanks sentiment (both included in the kit) then layered over the shaker windows.

The kit also includes a sentiment sticker sheet. I adhered the “a bunch” sticker over card stock then trimmed and adhered over the heart and foam front. By adhering the sticker to card stock, the sticker has a stronger base, providing a smooth surface over the uneven layers below.

I-Just-Love-You-500-R3

Next, I created a quick and easy “love” card using the heart and love dies from the Heart Throb kit as well as a partial sentiment from the stamp set included in the Fruit Basket kit.

I-Just-Love-You-500-CU-R3

I die-cut “love” three times from white card stock then once from patterned paper, layered and adhered to the white heart. I then used my MISTI to position the partial sentiment above and below the die-cut. The two hearts were adhered to the plaid patterned paper then stitched to the card front.

As a finishing touch, I adhered three glittery white Posies. I love the posies as they easily add a little sparkly detail to any design.

Thanks so much for stopping by today!

1amichele siggy

Queen & Company Foam Front Shakers

Hi everyone! Today I’m sharing a couple more cards created using items from Queen & Company’s amazing Black Friday Sale! Yes, the sale goes on (while supplies last)!

My first card uses the Hearts Foam Front Card kit which is part of the Special Foam Front Bundle.

Queen & Company Hearts Foam Front Shaker Kit

I used my favorite patterns from Flirty Florals paper pad. The sweet flowers and pink gingham are the perfect girly combination. (This is seriously my favorite paper pad ever. I adore the colors and small floral prints.)

Queen & Company Hearts Foam Front Shaker Kit

Inside the heart openings, I placed a combination of Fimo Fun, Pops, Diamonds and Posies toppings. As a little extra embellishment, I adhered a few pink Posies outside of the shaker openings, secured with Scrap Happy Sheer Glue.

“Miss You” is one of seven words/phrases found in Word Dies Assortment 1.  (You can find a second set of word dies HERE.) I die-cut the sentiment from the same darker pink patterned paper used inside the heart shaker openings.

Supplies:  Hearts Foam Front Card kit (Special Foam Front Bundle), Flirty Florals paper pad, Fimo Fun, Pops, Diamonds and Posies, Word Dies Assortment 1, Scrap Happy Sheer Glue

Queen & Company Circle Foam Front Shaker Kit

Next, I created another Miss You card, this time using the Circle Foam Front Shaker kit, which is also part of the Special Foam Front Bundle. Using my paper trimmer, I removed a bit from all four sides of the foam then adhered it to a panel of lightly patterned blue paper (also from Flirty Florals).  I placed a combination of white and ivory Matte Pearlies toppings in the opening then added the acetate cover (which also required a bit of trimming).

Queen & Company Circle Foam Front Shaker Kit

I sized the card cover to match the foam then adhered the card cover, sun, clouds and Word Dies.  I tied a bit of Black Twine to the left side with a button secured within the bow. The button is part of the Holiday Binder which includes eight colors of buttons, rhinestones, rhinestone flowers, pearls, organizer pages and, of course, the binder.

To add just a bit more detail to my card, I used a thin black marker to doodle faux stitches around three sides then used a white opaque pen to add bits of outline to the die-cut sentiment.

Supplies: Circle Foam Front Shaker kit (Special Foam Front Bundle), Flirty Florals, Matte Pearlies, Word Dies 1, Black Twine, button (Holiday Binder), Scrap Happy Sheer Glue

Be sure to check out the Black Friday Sale while supplies last!

Thanks for visiting!

1amichele siggy

More Queen & Company Black Friday Sale

Hi there ! Today I have a couple of cards to share using product from Queen & Company’s *amazing* Black Friday sale! The sale goes on, and seriously, the deals are incredible!

Queen & Company Black Friday Sale

On my first card, I used the Circle Foam Front kit which is part of the Black Friday Foam Front Card Bundle. I also used its coordinating Circle Designer die. The sentiment is from Black Friday Word Dies 1.  Word Dies 1 and Word Dies 2 each contain six to seven words or phrases, perfect for everyday occasions.

Queen & Company Black Friday Sale

The flowers, which I love, are part of the Black Friday Binder. The binder is available in seven colors and each contains eight colors of rhinestones, rhinestone flowers,  buttons, pearls and envelope organizers. It is an amazing deal!

Inside the circle, I placed yellow and green sequins as well as yellow donuts.

Supplies: Circle Foam Front Kit (Foam Front Card Bundle), Circle Designer Die, Words 1, Black Friday Binder, Sequins, Donuts, Dots Paper Pad, Stripes Paper Pad, Scrap Happy Sheer Glue

Queen & Company Black Friday Sale

Next, I used the Candles Shaker Card kit.  Inside I placed Diamonds, Donuts and one of my all-time favorite toppings – Posies.

Queen & Company Black Friday Sale

The word “friend” is another sentiment die from Black Friday Word Dies 1.

Supplies:  Candles Shaker Card kit, Black Friday Word Dies 1, Diamonds, Donuts, Posies, Stripes Paper Pad, Flirty Florals Paper Pad, Scrap Happy Sheer Glue

I hope you’ll stop by the Black Friday Sale today! The deals really are incredible (while they last!!

Thanks for visiting today!

1amichele siggy

Jingle All the Way with Queen & Company

Hi everyone! I have another card to share using the super fun Merry & Bright Ornament Shaker Kit from Queen & Company.  (Get yours before they’re gone! Oh, and be sure to check out the Black Friday Sale. It is AMAZING!  HERE.)

Queen & Company Merry & Bright Ornament Shaker Kit

I paired a couple of jingle bell shakers, adding soft matte beads inside.  I love that there are so many options with this kit. Six different ornament shapes, seven ornament tops, a super cute paper pad, stamp set with over 15 holiday sentiments, various colored beads and incredibly cute shaped toppings.  There are 18 foam shapes and 30 acetate shapes. Use the extras to make clear ornaments or tags! This really is an incredible kit!

Queen & Company Merry & Bright Ornament Shaker Kit

The kit is available HERE. And just in case you want to make more than 18 shaker ornaments, refill foam and acetate shapes are available HERE.

You can find my previous Merry & Bright posts HERE and HERE.

Thanks so much for visiting today!

1amichele siggy

Queen & Company Black Friday Sale!

Hi everyone!  Have you seen Queen & Company’s Black Friday Sale?  There are lots of good deals to be found! I think the prices are already great, but now?  I definitely recommend checking it out!  (Run!) Today I have two cards to share using some of those awesome bargains!

Congrats-Oval-500-2

First I created a Congrats card using the Oval Foam Front Shaker kit. I die-cut the frame using the corresponding Oval Designer Die and papers from Delightful Dots and Pretty Presents paper pads.

Congrats-Oval-500-2-CU

Inside the shaker I placed yellow and green sequins as well as yellow and green Diamonds. The sentiment was die-cut from one of two die sets created exclusively for the Black Friday Sale. Each set includes six or seven everyday words/phrases, perfect for all occasions. (Hippo Birdie stamps and dies and Bloomers Greenery dies by Taylored Expressions.)

The cute yellow flowers are one of many items included in Queen & Company’s Black Friday Rainbow Binder.  The binder includes eight colors each of rhinestones, pearls, buttons and flowers. It’s an *amazing* deal!

Supplies: Oval Foam Front Shaker Kit, Oval Designer Die, Delightful Dots paper pad, Pretty Presents paper pad, Sequins, Pastel Diamonds, Black Friday Word Dies 1, Rainbow Binder, Scrap Happy Sheer Glue

Hugs-Bubbles-500

Next I created a “hugs” card using Bubbles Foam Front Shaker Kit and coordinating Designer Die.  The black pearls are from the Rainbow Binder, and patterned paper is from Fruit Basket Mat Stack. I love the bright colors!

Hugs-Bubbles-500-CU

Inside the bubbles, I placed my favorite toppings, diamonds (they are AMAZING!) using Clear, Pink and Orange. (Surf & Turf stamps and dies by Paper Smooches.)

Supplies: Bubbles Foam Front Shaker Kit, Bubbles Designer Die, Rainbow Binder, Fruit Basket Mat Stack, Pastel Diamonds, Black Friday Word Dies 1, Scrap Happy Sheer Glue

Be sure to check out Queen & Company’s Black Friday sale HERE.  You won’t want to miss it!

Thanks for visiting today!

1amichele siggy

More from Queen & Company’s Merry & Bright Ornament Shaker Kit

Hi everyone! Today I have another card I created using Queen & Company‘s fab new Merry & Bright Ornament Shaker Kit.

Be-Merry-500

There are so many options in this kit. I chose one of the more ornate ornaments for this card, using gold foil card stock for the ornament.

Be-Merry-500-CU

The foam shape was adhered to patterned paper (included in the kit) then filled  with lovely pastel beads (included in the kit). I gold embossed the sentiment (stamp set included in the kit) and added small gold dots leftover from the ornament and top die-cuts. They make the perfect little faux metal accents.

In addition to the Merry & Bright kit, refill foam and acetate shapes are  available as are refill toppings. If you’d like additional toppings (shaker filling), you can find them HERE.

Thanks so much for visiting today!

1amichele siggy

Another Fab Queen & Company Kit – Merry & Bright Ornament Shakers

Hi there, and thanks for stopping by!  Today I’m sharing two cards I created with Queen & Company’s new Merry & Bright Ornament Shaker Kit.  The kit includes SIX ornament dies with an assortment of seven ornament tops, tiny toppings of snowmen, candy canes, green and red peppermints, gingerbread, several assortments of pearls (my personal favorite), an adorable holiday paper pad and holiday sentiment stamp set!  SO much fun!

Queen & Company Merry & Bright Ornament Shaker Kit

On my first card, I used two of the ornament dies, simply die-cutting the shapes from white card stock. I adore the detail of snowflakes in the round ornament. They’re so small and delicate! Inside, I placed an assortment of pastel pearls.

Queen & Company Merry & Bright Ornament Shaker Kit (close-up)

To add a bit of interest around the ornaments, I adhered the negative die-cut circles from the top of the ornament and ornament top dies.  I think they make  perfect little accents! The ornaments were tied at the top with blue stretchy string. To complete my card, I stamped the sentiment in white pigment ink then white/heat embossed.

Supplies: Merry & Bright Ornament Shaker Kit, Blue Stretchy String, Scrap Happy Sheer Glue

Queen & Company Merry & Bright Ornament Shaker Kit

Next I created a clean and simple card using one ornament die with an assortment of patterned papers and silver foil card stock for the tops. I filled the shaker ornament with bright pearls and tied/hung the ornaments with silver cord.

Queen & Company Merry & Bright Ornament Shaker Kit (close-up)

As on my first card, I used the negative space from the ornament and ornament top dies to create small faux metal accents. I especially like the look of the dots cut from foil card stock.

Supplies: Merry & Bright Ornament Shaker Kit, Scrap Happy Glue

My cards were so much fun to create! (More to come!) I think the recipients will enjoy them as well!  Thanks so much for visiting today!

1amichele siggy