Category Archives: Queen & Co.

New Birthday Bash Kit by Queen & Company

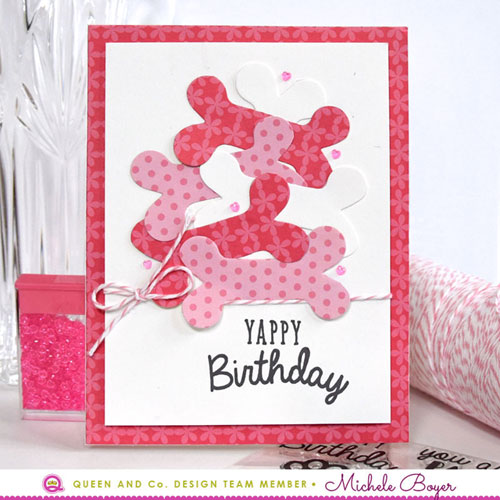
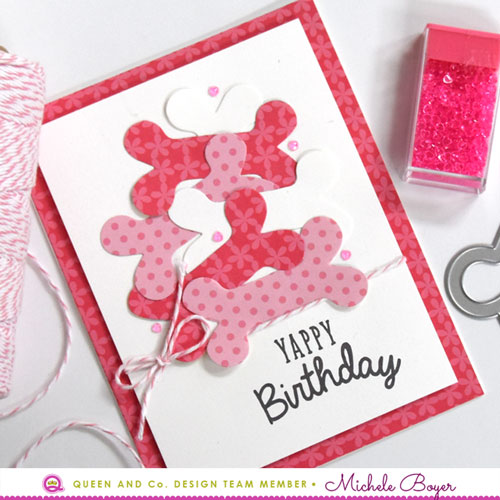
Hi everyone!  I’m sure by now you’ve seen Queen & Company’s new Birthday Bash kit. If you haven’t, you definitely need to check it out! It’s SO much fun and SO easy to create quick birthday and congrats cards.

The kit includes pompoms galore, three different sizes in seven different colors each! There are stamps with coordinating dies, candle flame bling and a Birthday Bash 6×6 paper pad.

Make-a-Wish-500

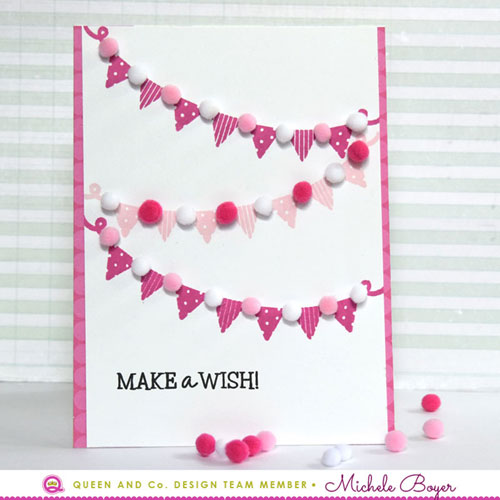
On my first card, I stamped the banner in two different pinks then alternated pompom colors of light pink, dark pink and white in between the flags.

Make-a-Wish-500-CU

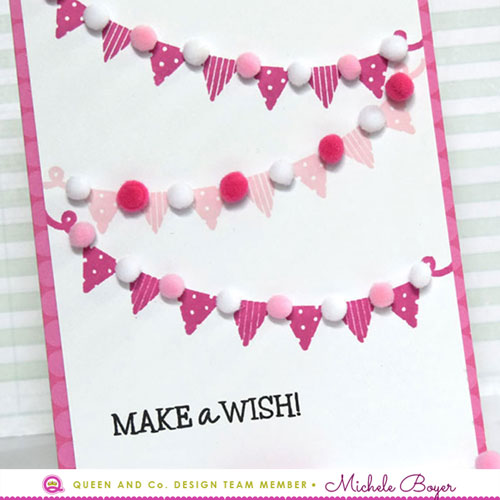
New Gloobers make adhering the pompoms very quick, easy and mess-free (my favorite part). They are super-sticky double-sided adhesive dots, available in three different sizes. They are included in the kit as well! Simply adhere a Gloober and press the pompom in place!

Hip-Hip-Hooray-500

Next, I used the balloon bouquet stamp and pompoms in a variety of sizes and colors.  Perfect for male, female, any age! I love that the Birthday Bash paper pad includes colors and patterns, all fun and perfectly suited for everyone.

Hip-Hip-Hooray-500-CU

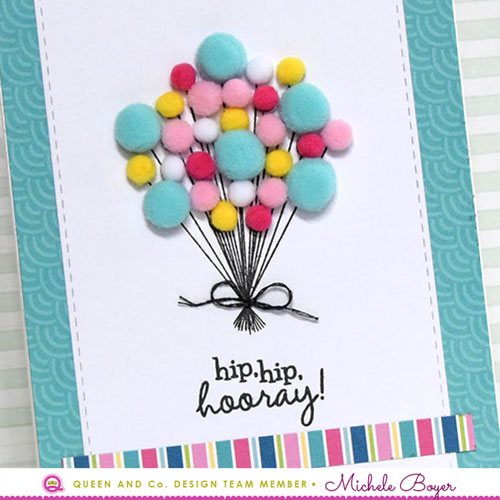
Before adhering the finished panel to my card base, I tied a bit of black string around the stamped strings.

You can grab your Birthday Bash kit HERE, an extra Birthday Bash paper pad HERE, refill pompoms HERE, extra Gloobers HERE and additional candle flame bling (otherwise known as Twinkle Drops) HERE.

Thanks so much for visiting today!

1amichele siggy

Pretty New Flowers from Queen & Company

Hello everyone! Today I’m sharing two cards using some of Queen & Company’s gorgeous new flowers! I had a hard time deciding which to use but I finally settled on two. If you take a peek at the choices, you’ll understand my dilemma.  🙂

Queen & Company new Layered Flowers

First I used new Layered Flowers.  There are four each of three different styles, eight colors, all shimmery with rhinestone centers. I adhered each of the flowers using new Gloobers.  Available in three sizes, they are super-sticky double-sided adhesive dots, perfect for adhering embellishments such as flowers, pompoms, anything really, but especially embellishments that might otherwise be a little tricky to adhere.

Queen & Company new Layered Flowers (close-up)

I used green Sparkle String to create stems and leaves, securing the ends on the back with tape. Along the top and bottom, I adhered thin strips of green Simple Stripes patterned paper then added a simple, white embossed sentiment.

Supplies: Layered Flowers, Sparkle String, Simple Stripes patterned paper, Gloobers 

Queen & Company new Glitter Flowers

Next, I used new Glitter Flowers in yellow and white to create a simple “thinking of you” card. The Glitter Flowers are so very pretty/cute. They remind me of icing on cakes.  : )

Queen & Company new Glitter Flowers

I adhered each of the flowers with a medium Gloober, tucking a simple die-cut leaf behind a few before securing. The stripes on the sides are also from Simple Stripes patterned paper, one of my all-time favorite “go-to” paper pads.

Supplies: Glitter Flowers, Simple Stripes patterned paper, Gloobers

Which are your favorites of the new flowers? Let me know below!

Thanks for visiting today!

1amichele siggy

Fun with Fruit (queen & company)

Hello everyone!  It’s been so very cold and dreary lately, I decided to pull out some fun bright papers and dies. Queen & Company’s Fruit Basket was the perfect fit!

First I whipped up a sweet orange card using the fruit slice die from the kit.

Queen & Company's Fruit Basket shaker kit

I sponged Twisted Citron and Cracked Pistachio Distress Oxide inks as a background, spritzed a bit of water, then added the striped paper (from the Fruit Basket paper pad included in the kit).  Before die-cutting the orange slices, I sponged Spiced Marmalade Distress Oxide ink and spritzed with water. After die-cutting, I added a bit more ink to the bottom of each slice.

Queen & Company's Fruit Basket shaker kit (close-up)

The shaker was filled with Fruit Toppings (extras HERE) and Jewels, and new Orange Epoxy Dots were added after stamping the sentiment.

Supplies: Fruit Basket kit, Jewel Toppings, Epoxy Dots, Sheer Glue

Before I get to my next card, I wanted to share how I store those super cute topping containers.

Topping-Trunk

Queen & Company’s new Topping Trunk INCLUDES 62 containers of the most popular toppings! I absolutely love it. It’s so nice to have them contained, all in one pretty sparkly pink place.  🙂  You can find a list of the toppings included HERE.

Next, I created a fun hippy slice of watermelon. (It’s a bit different…)  🙂

Queen & Company's Fruit Basket kit

I die-cut the green and pink pieces from the Fruit Basket paper pad, adding a bit of darker pink ink to the top of the slice. After gluing strands of pink and green Sparkle String across the rind, I punched a few holes and inserted two more strands. The ends are secured with tape on the back side. To accommodate for the bit of thickness on the back, I raised the main panel on foam tape after stamping the sentiment.

One-in-a-Melon-CU-500

I adhered two of the included black Twinkle Drops as eyes and a die-cut mouth (from Taylored Expressions’ Spare Parts).  As a finishing touch, I die-cut some small circles and randomly adhered around the watermelon.

Supplies: Fruit Basket kit, Sparkle String, Sheer Glue

Thanks so much for visiting today!  : )

1amichele siggy

More from Queen & Company’s Love Jar Kit

Hello everyone! I have two more cards to share using Queen & Company’s amazing Love Jar kit!  I love this kit so much. (If you missed my first two, you can find them HERE.)

Queen & Company Love Jar Kit

First I created a shaker filled with both stamped flowers and sequins. With some flowers stamped inside, the jar appears more full, even if the sequins are pooled at the bottom.

After determining the jar placement, I masked off that section with removable tape then stamped random flowers within. I adhered the foam shape, added a sprinkling of sequins and white flower toppings then adhered the acetate. Before gluing the jar and lid die-cuts, I sponged the bottom of the jar with a bit of blue ink.

Made-with-Love-500-R2-CU

I added some texture to the background by scoring vertical lines every ¼”. Then I tied the string and added the stamped tag. The strip of dotted paper was added after die-cutting just the bottom of the jar from one edge, then neatly snuggled up to the foam shape. Beneath, I stamped a row of hearts.

I adhered a few sequins outside of the jar then created a small heart from one of the flower sequins as follows:

Heart-Sequin-500

I nipped off two of the petals just above the hole. This creates the top of the heart. Then from the remaining (leftover) piece, I cut a small triangle from one of the petals. Once fitted together beneath the string, the two pieces create the appearance of a heart.

Supplies: Love Jar kit, Sheer Glue

Stamped-Flowers-Made-for-You-500

On my next card, I created a bit of a garden scene, stamping two of the stems and leaves from the stamp set in two different shades of green, bending each slightly in different directions.

Stamped-Flowers-Made-for-You-500-R2-CU

After stamping the flowers, I adhered the panel to a block of gray dotted paper from Flirty Florals (included in the kit). The tag was die-cut from the same gray dotted paper then stamped and tied on with gray twine. As a final touch, I adhered iridescent rhinestones (also included in the kit) into the centers of some of the flowers then adhered the assembled panel to my card base. Super easy!  : )

Supplies: Love Jar kit

Also available are foam and acetate refills as well as the Flirty Florals paper pad. (I think I’m on my fourth of this paper. That’s how much I love it.)

Thanks so much for visiting today!

1amichele siggy

Queen & Company’s *fab* new Love Jar Kit

Hi there!  I’m super excited to be sharing my first two samples today using Queen & Company‘s new Love Jar kit. It’s my new favorite! The kit includes one of my most beloved paper pads – Flirty Florals, jar dies with two stitched tags, NINE pre-cut foam and acetate shapes, a lovely stamp set filled with hearts, flowers, stems, leaves and sentiments, five colors each of twine and rhinestones, flower sequins and, of course, super-cute toppings!  There are six colors of tiny flower shapes, clear diamonds (another of my favorites) and adorable teeny tiny wood circles, stars and hearts! Oh my. So much love!

Filled-with-Thanks-500

To create my first card, I used removable tape to mask off a small section for sponging light blue ink inside the jar. I stamped the flowers, stems and leaves then adhered the jar foam shape. Inside, I placed some white flowers, clear diamonds and wood hearts.

Filled-with-Thanks-500-CU

After adhering the acetate, I die-cut the jar and jar top from white card stock and the little frill of scalloped trim from pink gingham. Once the jar was assembled, I die-cut and stamped the cute heart tag and tied to the jar with pink twine. I used three tiny hearts along the left side as an extra embellishment.

Supplies: Love Jar kit, Sheer Glue

For-You-500

Next, I used the stamps to create my own patterned paper, using white flower toppings as flower centers. The sentiment was stamped onto black cardstock using white ink, then white embossed.

For-You-500-CU

Within the bag of mixed flower sequins, there are itty bitty circles from the sequin centers. I used a sprinkling of them on my card to add bits of colorful shine. I applied a tiny dot of glue then used a Quickstick (any tacky ended tool will do) to place the tiny sequin piece in the glue.

Supplies: Love Jar kit, Sheer Glue

In addition to the Love Jar kit, refill foam and acetate shapes are available. You can find an extra Flirty Florals paper pad HERE and a variety of sparkly diamonds HERE.

Thanks so much for visiting today!

1amichele siggy

More New Mini Stamps from Queen & Company

Hi everyone! I’ve been having lots of fun with Queen & Company‘s Shaped Shaker kits and new coordinating mini stamp sets.  My cards today both use Dog Shaped Shaker set with its coordinating mini stamp set and Picture Perfect patterned paper.

You-Are-Pawsome-500

On my first card, I created a background of patterns from Picture Perfect paper pad. After adding the stitching, I stamped the sentiment in white ink then white embossed.

You-Are-Pawsome-500-CU

Inside the shaker, I placed blue, green and white Pops, covering with white card stock paws. For a bit of additional embellishment, I adhered a few black Epoxy Dots, rounded the corners and popped up the panel on foam tape.

Supplies: Dog Shaped Shaker Kit, mini stamp set, Pops, Picture Perfect paper pad, Epoxy Dots, Sheer Glue

Next I created a more feminine dog card using the inside (negative) pieces from the bone shaker die.

Yappy-Birthday-500

I cut the bones from various patterns within the Picture Perfect paper pad and white card stock then adhered in the shape of a pile with the sentiment stamped beneath.

Yappy-Birthday-500-CU

Before adhering the panel to my card base with foam tape, I adhered a scattering of new Jewel toppings and tied a bow of baker’s twine.

Supplies: Dog Shaped Shaker Kit, mini stamp set, Jewel toppings, Picture Perfect paper pad, Sheer Glue

For easy viewing, you can find all available Shaped Shaker Kits with each corresponding mini stamp set HERE.

Thanks so much for stopping by!

1amichele siggy

New Mini Stamp Sets from Queen & Company

Hi everyone! Did you know Queen & Company recently released nine new mini stamp sets? Each one coordinates perfectly with their Shaped Shaker Kits.  I have two samples today using the Spring Shaped Shaker kit and new Spring clear stamp set.

Queen & Company Shaped Shaker Kit

I kept my card very simple, using white card stock and a scrap of Flirty Florals patterned paper.  I die-cut the umbrella and cloud, nipping away the part of the cloud that fell within the umbrella.

Queen & Company Shaped Shaker Kit (close-up)

Inside the shaker, I placed an assortment of new Jewel toppings.  The bright hearts, stars and flowers come in eight colors and are perfect for shaker cards!

Supplies:  Spring Shaped Shaker kit, Spring clear stamp set, Flirty Florals patterned paper, Jewels toppings, Sheer Glue

Queen & Company Shaped Shaker Kit

Next, I adhered the sun and cloud die-cuts from Spring Shaped Shaker kit over Simple Stripes patterned paper then stamped a second sentiment from Spring clear stamp set. I love the thin white lines within the word SHINE.

Queen & Company Shaped Shaker Kit (close-up)

This time I used only the clear and yellow Jewels, adhering “rays” of yellow flowers coming from the sun. Toppings are perfect for shaker cards, but I also like to use them as embellishments outside of a shaker.  🙂

Supplies:  Spring Shaped Shaker kit, Spring clear stamp set, Simple Stripes patterned paper, Jewels toppings, Sheer Glue

Thanks so much for visiting today!

1amichele siggy

Picture Perfect Shaker Kit by Queen & Co.

Hello everyone. Today I’ve used an older (but SO fun) shaker kit from Queen & Company — Picture Perfect.  The kit includes a paper pad, camera dies, pre-cut foam and acetate, sticker sentiments and pearl toppings in eight colors.  The paper pad includes a variety of patterns and colors, perfect for creating both masculine and feminine cards.  I created one of each.

Picture-Perfect-2-500

On my first card, I used the pink and floral patterns and placed pink pearl toppings inside the shaker. After removing the sentiment sticker from the release sheet, I adhered it to card stock for extra stability, trimmed and adhered over the shaker. I trimmed and adhered foam pieces beneath each end to stabilize and level the sentiment. (I use the leftover foam pieces from the shaker.)

Picture-Perfect-2-CU-500

Using Sheer Glue, I adhered a few hearts throughout then adhered three tiny peppermint Candy Toppings as extra embellishments.

Supplies:  Picture Perfect shaker kit, Sheer Glue, Candy Toppings

Picture-Perfect-1-500

My second card could be used for a girl or boy as I used gender neutral colors and patterns. Inside the shaker, I placed blue Candy Toppings as well as green and yellow pearls from the kit.

Picture-Perfect-1-CU-500

I created a bit of pattern on white card stock by die-cutting small patterned circles and adhering with Sheer Glue. I added three iridescent pearls, cut my sticker sentiment to a tag shape (after adhering to white card stock) then tied a bit of green string.

Supplies:  Picture Perfect shaker kit, Sheer Glue, Candy Toppings

Along with the Picture Perfect kit, foam and acetate refills are available, as is a separate Picture Perfect paper pad. And if you run out of pearl toppings, more of those are available here. I just love that Queen & Co. provides refills for kits. So very thoughtful.  🙂

Thanks so much for stopping by!

1amichele siggy

You Make Life Sweeter (Queen & Company Candy Land shaker kit)

Hi there crafty friends!  Today I’m sharing two cards I created using Queen & Companys latest kit, Candy Land.  It is super sweet and so much fun! I especially like the lollipop die and cute toppings.  🙂

My first card uses both the lollipop and wrapped candy dies (my faves).

Queen & Company Candy Land Kit

I die-cut two lollipops, turning one into a shaker. I die-cut each twice, nipping away the colored sticks and replacing with white. Before adhering the white sticks, I colored each with a light tan marker.

Queen & Company Candy Land kit (close-up)

I added a few wrapped candies, stamping jelly beans and peppermint twists into two of the centers and using the third to frame the sentiment.  I placed a few foam squares under the wrapped candies for a bit of dimension then adhered a sprinkling of toppings as extra embellishment.

Supplies: Candy Land Kit, Sheer Glue

Next, I created a card using the adorable candy stamps included in the kit.

Queen & Company Candy Land kit

I used my MISTI and MISTI creative corners to align and stamp the candies in pink, purple and green inks.

Queen & Company Candy Land kit (close-up)

Once stamped, I adhered white toppings into some of the small candy centers, added thin black card stock strips and stamped the sentiment.

Supplies: Candy Land Kit, Sheer Glue

Thanks so much for visiting today!

1amichele siggy

Bee Mine Love Shaker Card (stamping bella)

Hi everyone. Welcome to another Bellarific Friday with Stamping Bella! This week the team is featuring the February Stamp of the Month, Bee Mine, available at 20% off through February 28. So cute and perfect for Valentine’s Day!

Stamping Bella Bee Mine/Queen & Company LOVE Foam Front

I paired my cute honey bear with one of Queen & Company‘s Love Foam Front Shaker Kits. (The kit comes with supplies to create two cards. Toppings available separately. I used Pops. More shaker cards can be found HERE.)

Behind each window, I placed a block of various patterns from Flirty Florals 6×6 paper pad.  (One of my faves, as you probably already know.)

Stamping Bella Bee Mine/Queen & Company LOVE Foam Front (close-up)

Copic markers – E30, E31, E33, E35, E37, N9, R01, R02, R39, R83, RV11, RV32

After stamping the bear, I colored with markers (listed above) and then very carefully cut around him with small, sharp scissors. Before assembling, I embossed the cover and die-cut a heart to tuck behind the bear.

NEXT WEEK’S CHALLENGE

Use a vintage Stamping Bella image, meaning one NOT from the current/most recent release. (If the image is not listed in the “what’s new” category, then it’s considered “vintage.” If you’d like, email your card to [email protected] by next Thursday to be featured on the SB blog. By doing so, you’ll also be entered to win some Bella Bucks! (All challenge details can be found HERE.)

Thanks so much for visiting today! 🙂

1amichele siggy