Category Archives: Queen & Co.

Monster Mash Pumpkins and Bats (Queen & Company)

Hey everyone! Today I’m sharing two more cards I created using Queen & Company’s super cute Monster Mash kit!  (You can see the first two **HERE**.) While the kit is full of fun monster possibilities, today I focused more on Halloween.

Queen & Company - Monster Mash kit

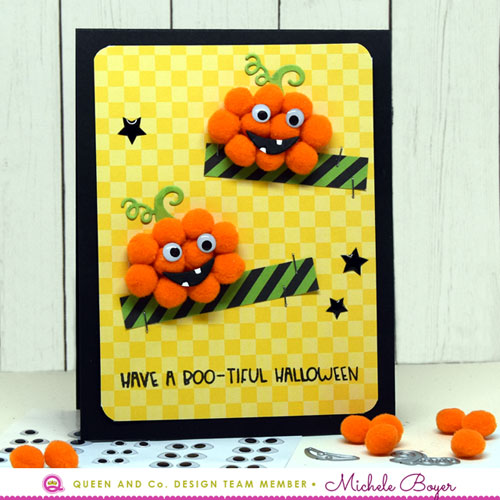
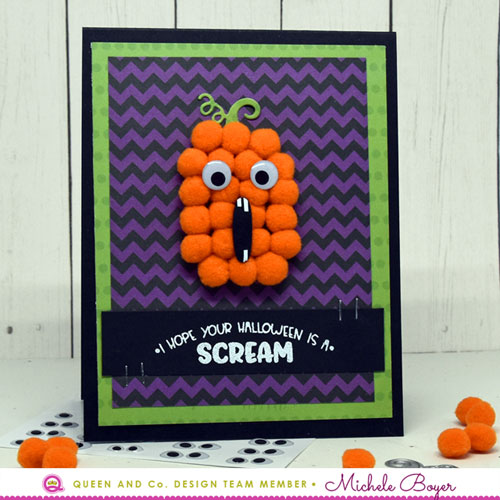
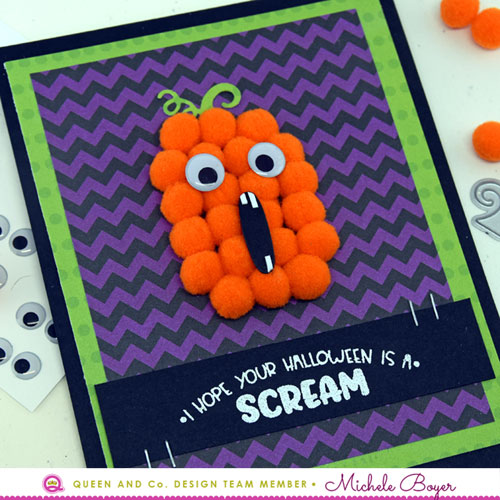
I first adhered two striped strips of patterned paper to a block of yellow paper, securing the ends with small staples. I adhered Gloobers in the shape of each pumpkin then adhered orange pompoms. I used the two layering dies to create the mouths, one die-cut from black, the other die-cut from white. The white piece was placed behind the black, allowing the white teeth to show. Sheer Glue holds the mouth and eyes in place.


Queen & Company - Monster Mash kit

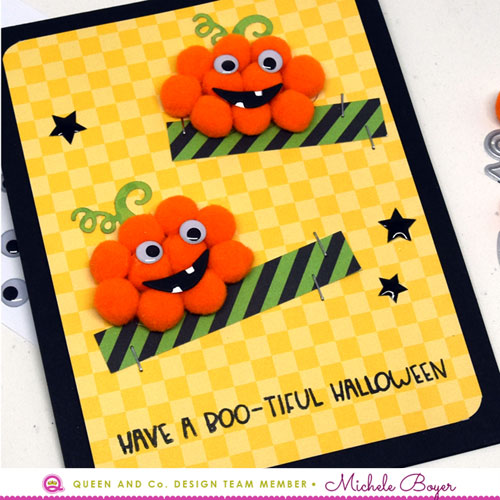
I added two die-cut stems, stamped the sentiment and adhered a few star shapes before securing the panel to a black card base.

Supplies:  Monster Mash kit, Fright Fest paper pad, Gloobers, Sheer Glue

Next, I created a fun (quick and easy) bat card.

Batty-for-You-500

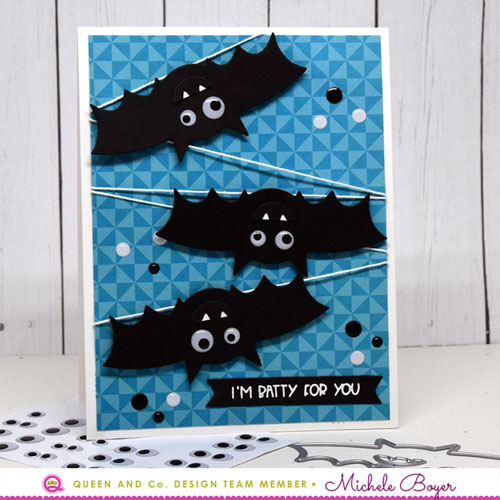
I die-cut three bat shapes then die-cut and assembled three mouths. Once the eyes and mouths were adhered to the bodies (using Sheer Glue), I positioned the bats in place over the blue patterned paper. Using the bats as a guide, I wrapped white string, securing the ends on the back side. Once the string was in place, I adhered the bats, placing foam squares beneath the wings.

Queen & Company - Monster Mash kit

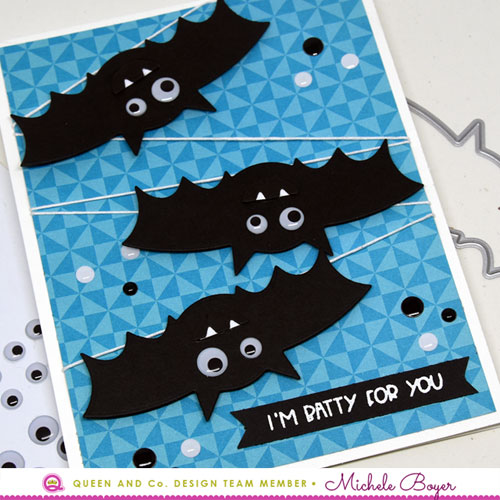
I stamped the sentiment in white, white embossed then cut the strip into a flag shape and adhered. As a finishing touch, I added some black and white Epoxy Dots.

Supplies:  Monster Mash kit, Fright Fest paper pad, Epoxy Dots, Sheer Glue

Thanks for stopping by today!

1amichele siggy

Queen & Company’s new MONSTER MASH kit!

Hello everyone!  Have you seen Queen & Company’s new Monster Mash kit? Oh my gosh…SO cute! The kit includes pompoms in various colors and sizes, monster and critter part dies, eyeballs of different sizes, a super cute sentiment stamp set and an assortment of Gloobers which make adhering the pompoms *super* easy.

First, I created two friendly and very silly spiders.

Queen & Company - Monster Mash kit

After die-cutting the spider bodies, I adhered medium Gloobers then attached the pompoms.  While the eyes are adhesive, I used a dot of Sheer Glue on the back of each for extra staying power. The zig zag mouths were also adhered with Sheer Glue.

Queen & Company - Monster Mash kit (close-up)

I adhered the body portion of each spider to a panel of yellow patterned paper from the Fright Fest paper pad, leaving some of the legs to bend forward just a bit. I cut two thin strips of striped paper and adhered each as a spider web/string before adhering the purple die-cut frame. The sentiment was stamped in white then white embossed, cut apart and adhered below the spiders. I popped up every other word on foam tape. Lastly, I added a sprinkling of Epoxy Dots.

Supplies:  Monster Mash kit, Fright Fest paper pad, Gloobers, Epoxy Dots, Sheer Glue

Queen & Company - Monster Mash kit

Next, I created a large pumpkin, adhering Gloobers to the purple chevron paper then attaching the orange pompoms in the pumpkin shape. I glued on the eyes then the die-cut stem.

Queen & Company - Monster Mash kit (close-up)

I wanted my pumpkin to scream, as mentioned in the sentiment, so I used the inside of a larger zero die to create the oval. I cut a very thin strip of white card stock then trimmed tiny teeth of various lengths and adhered to the top and bottom edges. The sentiment was stamped in white then white embossed.

Supplies:  Monster Mash kit, Fright Fest paper pad, Gloobers, Sheer Glue

I had so much fun creating my spiders and screaming pumpkin! Can’t wait to make more!

Thanks so much for visiting today!

1amichele siggy

Queen & Company’s Window Shaped Shaker Kit

Hi everyone! Today I’m sharing two cards using Queen & Company‘s new Windows Shaped Shaker kit. With three basic window shapes and accessories, many different looks are possible! The kit also includes foam and acetate shapes as well as a coordinating stamp set.

Queen & Company Windows Shaped Shaker Kit

To create my first window scene, I die-cut the window and flower box shapes from white card stock.  Behind the window, I used pretty patterns from Flirty Florals paper pad to create wallpaper and a gingham curtain.  Yellow Delightful Dots paper was used as the outside of the home.

Queen & Company Windows Shaped Shaker Kit (close-up)

Within the window shaker, I used several coordinating colors of Iridescent Bubbles.  The flower box was raised on foam tape with the stems tucked inside and die-cut flowers adhered atop. (The flower center toppings I used are no longer available but these Love Jar Flower Toppings are a cute alternative.)

Supplies: Windows Shaped Shaker kit, Flirty Florals paper pad, Delightful Dots paper pad, Iridescent Bubbles, Sheer Glue

Queen & Company Windows Shaped Shaker Kit

Next, I created a window as if the front of the card is actually the inside of the home. I used a square die to cut a square from the Flirty Floral paper then adhered acetate and the white window frame over the opening. The awning die was used to create a curtain which “hangs” from a thin strip of card stock colored with a brown marker to resemble a curtain rod.

Queen & Company Windows Shaped Shaker kit (close-up)

The front panel was raised on foam tape so that flowers could be adhered behind the window as if growing from an outside planter. In the flower centers I adhered clear Iridescent Bubbles.  I created a tag for the sentiment, tying on with baker’s twine.

Supplies: Windows Shaped Shaker kit, Flirty Florals paper pad, Iridescent Bubbles, Sheer Glue

Thanks so much for visiting!

1amichele siggy

Queen & Company’s New Magical Characters Kit

Hi everyone! As a big Disney fan, I was super excited to see Queen & Companys new Magical Characters kit. The kit contains a themed paper pad, 11 dies, 13 super-cute toppings, 15 foam shaker shapes and a coordinating stamp set.  So much fun!

Im-All-Ears-500

To create my first card, I die-cut one large and two small black circle shapes then glued them in place over pink patterned paper from the Magical Characters paper pad.  I used the bow die to die-cut the outline from white card stock, then used the outline of the die as a template to cut the floral paper. I adhered the floral paper behind the white die-cut outline then attached over the ears using foam tape.

Im-All-Ears-500-CU

I stamped the sentiment onto a white card stock strip then used the larger circle die to cut the ends to the curve of the black circle. The left and right edges of the sentiment strip were adhered with a slight gap left between the two pieces.

Supplies: Magical Characters Kit, Sheer Glue

Quite-a-Character-500

Next, I created a Donald Duck look-a-like card using patterned paper from the Magical Characters paper pad and the bow die.

Quite-a-Character-500-CU

In the shaker, I placed red, yellow and white Confetti toppings, then stamped the sentiment in white ink and white embossed.

Supplies: Magical Characters Kit, Confetti toppings, Sheer Glue

There are so many possibilities with the Magical Characters kit. And it’s perfect for scrapbooking those magical vacation memories!  Magical Character foam/acetate refills, toppings, magical ribbon and paper pad are also available individually.

Thanks so  much for visiting!

1amichele siggy

More Bug Jar from Queen & Company

Hi there! I have two cards to share using a variety of fun new product from Queen & Company! (Their products are ALL super fun!)

My first card uses both Love Jar and Bug Jar kits, new Love Jar Flower & Stem dies and a sprinkling of new Wood Toppings. I was so very excited to see the Love Jar dies, and those wood toppings….adorable! There are six shapes, each packaged in new mini topping bottles.

Flying-By-500

I used a block of Birthday Bash patterned paper as my background. After stamping and die-cutting the flowers, I positioned each on the patterned paper, using the jar die as a guide. The bottom half of each stem was glued in place then the jar foam shape was adhered. I filled with Love Jar toppings, Bug Jar toppings, a few clear Diamonds and Wood Heart shapes. Before adhering the jar top, I nipped off the flower stems at the top of the jar, adhered the jar lid, then inserted each stem through the jar lid opening, tucking the top edges back under the flowers. Each end was secured using Sheer Glue. Each flower at the end of a stem was adhered using a foam square (cut from the negative space leftover from within the foam jar shape).

Flying-By-500-CU

Once the jar was assembled, I stamped, colored and die-cut a dragonfly and butterfly then attached each to the jar and patterned paper. I applied glue only to the body portion so that I could bend up the wings slightly. I tied a bit of string then stamped the sentiment.

Supplies:  Bug Jar kit, Love Jar kit, Birthday Bash patterned paper, Diamond Toppings, Wood Toppings, Sheer Glue

Life-is-Brighter-500

Next, I stamped the lightning bug from Bug Jar stamp set in a block pattern and colored the bodies with bright Copic markers.

Life-is-Brighter-500-CU

I also used a marker to highlight the word “brighter” in the sentiment. (I love the font!)

Once colored, I adhered the panel to a block of Fruit Basket patterned paper, then adhered to a card base.

I’ve been having a blast with the Bug Jar kit, and I love that it corresponds so nicely with the Love Jar.

Supplies:  Bug Jar kit, Fruit Basket patterned paper

Thanks so much for visiting today!

1amichele siggy

Queen & Company’s New Bug Jar Shaker Kit

Hi everyone! Today I’m sharing two cards I created with Queen & Company’s adorable new Bug Jar kit. The kit ingredients work well on their own, or perfectly with my favorite, Love Jar kit.  The Bug Jar kit includes 30 stamps, 16 dies and 11 collections of the cutest little bug toppings!

Queen & Company Bug Jar/Love Jar Kits

To create my first card, I used the jar and lid die from the Love Jar kit, with patterned papers from Birthday Bash paper pad. Inside the jar, I placed cute tiny bee toppings along with some blue flowers from the Love Jar kit.

Queen & Company Bug Jar/Love Jar kits

I stamped, colored and die-cut several bees, attaching two to the shaker window using Sheer Glue. The glue was placed behind the body portion only so the wings were free to bend forward just a bit. I adhered a third bee over a stamped dotted trail and tucked the last one just inside the jar lid. He’s looking for a quick escape.  🙂 Lastly, I tied a bit of yellow twine (from the Love Jar kit) around the jar lid.

Supplies:  Bug Jar kit, Love Jar kit, Birthday Bash patterned paper, Sheer Glue

Queen & Company Bug Jar kit

I kept my second card very simple, using only stamps and dies from the Bug Jar kit. After stamping the branch and leaves, I added a bit of shadow using light gray markers to create dimension. The caterpillar was stamped, colored then die-cut and adhered above the branch.

Queen & Company Bug Jar kit

I stamped the cute sentiment beneath the branch then adhered the completed panel over Fruit Basket patterned paper.

Supplies: Bug Jar kit, Fruit Basket patterned paper, Sheer Glue

In addition to the Bug Jar Kit, a collection of refill Bug Jar Toppings are available.

I see the Bug Jar kit quickly becoming one of my favorites. I adore the sentiments and bugs!

Thanks so much for visiting today!

1amichele siggy

Apples and Lemons (more pom fun – queen & company)

Hi everyone! I’ve been playing again with Queen & Company’s fun pompoms from the Birthday Bash kit. (It’s hard to stop!)

Thanks-for-Everything-500

First, I created a thank you, perfect for a teacher, tutor or anyone, really.

I used a tree die to create the tree base, then adhered to light blue Simple Stripes patterned paper. Then, using Sheer Glue, I randomly adhered small and large green pompoms.

Thanks-for-Everything-500-CU

Between the green pompoms, I tucked several red Rubber Bubbles to resemble apples. I added a single red Rubber Bubble at the tree base, drew a tiny stem and added a small die-cut leaf.

Supplies: Pompoms from Birthday Bash kit, Simple Stripes patterned paper, Red Rubber Bubbles, Sheer Glue

Pucker-Up-500

Next I created a super simple card with pompom “lemons.”  I pinched the ends of six yellow pompoms then adhered each with a small Gloober.


Pucker-Up-500-CU

I drew in tiny stems then added die-cut leaves. Once the sentiment (from Paper Smooches) was stamped, I adhered the panel to a block of green Delight Dots patterned paper. The assembled panel was then adhered to a white card base.

Supplies: Pompoms from Birthday Bash kit, Delightful Dots patterned paper, Red Rubber Bubbles, Gloobers

Q&C pompoms are available as part of the Birthday Bash kit as well as a kit refill and cute individual drawstring bags.

Thanks so much for visiting today!

1amichele siggy

Fun with PomPoms (queen & company)

Hello there! I have been having loads of fun playing with Queen & Company’s pompoms.  The poms are available in the super cool Birthday Bash kit as well as individual colors/sets (in cute bags) and as a kit refill. So many great options.  : )

Thank-You-Poms-500

On my first card, I used multiple pompoms to create flowers in the shape of a heart on yellow Delightful Dots patterned paper. I found it helpful to layout the design first then snap a quick photo with my cell phone to use as a reference when adhering the poms.

Thank-You-Poms-500-CU

To create the small green leaves, I trimmed just a tiny bit away from one side of a small green pom then pinched the ends before adhering.

To adhere each pom, I used medium and small Gloobers. Using the Gloobers, assembly was quick and easy with no mess. Once assembled, I added a die-cut sentiment then adhered the panel to my card base.

Supplies:  PomPoms from Birthday Bash kit, Delightful Dots patterned paper, Gloobers, Handlettered Greetings (Simon Says Stamp)

Welcome-Baby-500

Next, I created a Welcome Baby card, using pompoms as a sort of mobile. I first adhered a block of Flirty Florals pattered paper to a white card base. I then die-cut white card stock using the long side of an oval die. I die-cut a second piece of white card stock, again with the oval die, then slid the die down just a bit and die-cut again to create the arched border. I adhered a strip of foam tape behind the “canopy,” then adhered lengths of white string to the foam tape. I adhered the canopy to the top of the floral paper with the strings loosely hanging down.

Welcome-Baby-500-CU

I determined the length of each string then adhered Gloobers to hold the string ends in place. I trimmed away the excess string then adhered my poms.

To create the white “paneling” below the mobile, I firmly scored white card stock every ¼”, added a thin strip across the top and, lastly, adhered the die-cut sentiment.

Supplies: PomPoms from Birthday Bash kit, Flirty Florals patterned paper, Gloobers, Handlettered Greetings (Simon Says Stamp)

The Birthday Bash kit can be used for so much more than just birthdays! How else can you imagine using the pompoms?

Thank so much for visiting today!

1amichele siggy

Sparkle String and Rubber Bubbles (Queen & Company)

Hi everyone! Today I’m sharing two cards using Queen & Company ’s new Sparkle String and Rubber Bubbles. New Sparkle String is available in ten colors with Rubber Bubbles available in eight.  ALL FUN.


Hello-Rubber-500

I can’t get enough of Q&C’s Love Jar kit so stamping flowers was the first thing to pop into my mind.  I stamped some in the background and some on separate paper, cut out and then adhered those using a bit of foam tape. In the center of several flowers, I placed purple and yellow Rubber Bubbles.  I just love their vibrant color, and think they’re perfect as flower centers.


Hello-Rubber-500-CU

At the bottom of the stamped panel, I tied a bit of pink Sparkle String then stamped the sentiment (from Paper Smooches’ Scripty Sayings) in white ink then white embossed.

Supplies: Love Jar Shaker kit (stamps), Purple and Yellow Rubber Bubbles, Pink Sparkle String

Birthday-Sweet-Sparkle-String-500

Next, I created a bright lollipop using pink, green and white Sparkle String. I die-cut the lollipop stick using the lollipop die from the Candy Land Shaker kit.  I adhered a block of double-sided adhesive sheet to white card stock then die-cut a circle roughly the same size as the lollipop die. I removed the top release paper, revealing the sticky sheet, and beginning in the center, wound the three strings around to cover the circle. Once covered, I adhered the pop and stick to a panel of Picture Perfect paper.


Birthday-Sweet-500-CU

I tied a bit of white Sparkle String around the stick, stamped a sentiment from the Candy Land kit and added a few white Rubber Bubbles.

Supplies: Candy Land Shaker kit (sentiment and lollipop die), Picture Perfect paper pad, Pink, Green and White Sparkle String, White Rubber Bubbles

You can find all Sparkle String HERE and all Rubber Bubbles HERE.
Thanks so much for visiting today!

1amichele siggy

Ric Rac Rainbows and Halo Buds (Queen & Company)

Hello everyoneToday I’m sharing two cards using some of Queen & Company‘s fab new embellishments! There are sooo many fun choices. Today I’ve used some new fibers and new shiny bling.  : )

Sunshine-Ric-Rac-500

Using the Rainbow Foam Front Shaker kit as inspiration, I created a Ric Rac rainbow using pink, green, blue and purple. At the end of the rainbow is a cloud shaker from Spring Shaped Shaker Kit.

I adhered the ric rac with super sticky double-sided tape, trimmed the left edges and marked the cloud ends lightly with a pencil, using the cloud shape as a guide. I trimmed the ends with sharp scissors then adhered the cloud foam shape.

Sunshine-Ric-Rac-500-CU

After filling the cloud with Sequins and Jewels, I stamped a Spring clear stamp sentiment in the corner.  Once assembled, I adhered the completed panel to bright pink dotted paper from new Birthday Bash paper pad.

Supplies: Pink, Green, Blue and Purple Ric Rac, Birthday Bash paper pad, Spring Shaped Shaker kit, Spring clear stamps, Sequins, Jewels

Next, I created a pattern of small flower buds using new Purple Halos and tiny die-cut leaves.

Hello-Halos-500

The new Halos are available in seven colors, all super-sparkly.

I adhered three rows of three then added tiny die-cut leaves (from Paper Smooches Flowers 2), cut from Picture Perfect patterned paper.

Hello-Halos-500-CU

Once the Halos and leaves were assembled, I adhered the panel to a block of purple Delight Dots patterned paper then again onto a white card base.  To finish my card, I added a die-cut hello sentiment (from Simon Says Stamp Handlettered Greetings).

Supplies: Purple Halos, Delightful Dots paper pad, Picture Perfect paper pad, Sheer Glue

Thanks so much for stopping by today!

1amichele siggy