Category Archives: Stampin’ Up!

Heartfelt Sympathy

Good morning!  I’ve been scrambling lately with end of school activities, swim practices, deadlines and preparing for company with not much time for stamping just for fun.  But my husband needed a sympathy card for his coworker.  

Heartfelt Sympathy

SUHFS

I stamped directly onto the patterned paper.  Here’s the inside:

       SUHFSIS

I made a matching envelope too (using leftover scraps) but I didn’t get a picture of it.

I’ll be posting a HUGE list of Stampin’ Up stamp sets and accessories for sale here very soon.  I’m purging.  Hopefully I have priced everything to move.  I need it out of here!

Thanks so much for stopping by!  Have a great weekend!

Stamps:  Stampin’ Up! “Close as a Memory” and “Hope for Comfort;” Cornish Heritage Farms “Beautiful” (The Rummage Bin)   Ink:  Memento Tuxedo Black, Ranger Brushed Corduroy Distress   Cardstock:  Prism Crabapple Dark   Patterned Paper:  Basic Grey Perhaps paper pad   Accessories:  SU markers (Really Rust, More Mustard, Close to Cocoa), WRMK hardware, ribbon, sewing machine, edge distresser, sponge.

All Good Things Must End

Happy Wednesday!  I tried to post this earlier but my blog was not cooperating.  Anyway…

We made this at my very last Stampin’ Up workshop.  Yep, I’m done (for various reasons).  In a way, I’m a bit disappointed as I liked getting together with friends to stamp but…it’s time to move on.

Thank You

TUSU

I used one of  my all-time favorite color combos, Chocolate Chip and Cameo Coral.  I blew the dust off of my Floral background and I used my last piece of Aged Copper Hodgepodge.  THAT I will miss.  If anyone knows where I can buy hardware pieces that have that dark, aged look, please let me know.  I’ve seen antique copper all over, but nothing like these very dark aged pieces.  I *heart* them!

Thanks so much for stopping by!  I hope you have a great day! 🙂

Cardstock:  Chocolate Chip, Cameo Coral, Very Vanilla   Stamps:  SU Fresh Cuts, Floral   Ink:  Chocolate Chip   Accessories:  Aged Copper Hodgepodge, Martha Stewart Ribbon, Sponge.  Card size 5 ½” x 4 ¼”.

Back from the Bat Cave

Hi, everyone!  That’s where I feel like I’ve been…in a cave.  It’s been pretty dark and very, very quiet.  My son’s surgery went well.  Wednesday was a bit rough, but yesterday was much better.  He had his post-surgery check and the doctor says his eyes look great.  I’ll have to take her word for it though as his eyes seriously make me ill.  (My stomach handled the seventeen stitches in the back of his head last year much better.)  Thank you all so very much for your kind thoughts, well wishes and emails.  I truly appreciate each and every one of them. 

So…I’ve had this image stamped and ready for color for a while.  It’s my all-time favorite (quite old Stampin’ Up) Halloween set.

Happy Halloween

HHST

I used Copic markers to color the image.  I cut the (hat) star and pumpkin pail ‘out of the box’ then sponged the edges to dirty them a bit.  You can’t tell in the photo, but I used a clear glaze pen on the trick or treat bag, hat star, garland, caramel and pumpkin pail.

HHCUST3

I popped up the trick or treat bag, garland and pumpkin pail, placing a rolled glue dot beneath each pumpkin on the garland and a tiny dot of glue under the first and last candy in the string. 

Cardstock:  Prism Natural Smooth, Black, Papaya Puree Dark   Patterned Paper:  Imagainisce Hallowhimsy “Eat, Drink and Be Scary” and “Wicked Whimsy”   Stamps:  Stampin’ Up! Sweeter Treaters and Everyday Flexible Phrases   Ink:  Adirondack Pitch Black, Ranger Walnut Stain Distress   Accessories:  Copic markers, Sakura clear gel pen, mm brad, glue dots, pop dots, sewing machine, sponge. Card size 5 ½” x 4 ¼”.

Thanks so much for stopping by and have a SUPER day!

m.

p.s.  SALE at Jacksonbelle Embellishment today through Monday night.  15% off everything in the store with code LABOR08.

Peep!

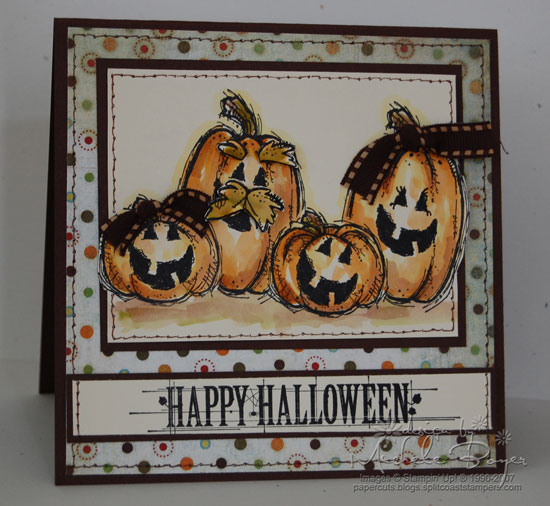
Wow, two posts in one day…that’s a first!  I had the last one planned, but then I really wanted to do the sketch challenge today at SCS.  (Trust me…the double posts will *not* become a habit. lol.) 

I’ve been trying to come up with something different for a workshop I’m having Friday night.  After a bit of a struggle with some coloring issues, I’m finally happy with the result. 

HEO425

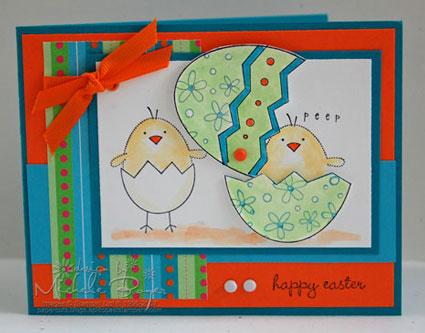
I thought this set, A Good Egg, was so cute!  The egg top swivels open and closed, hinged by the orange brad.  Here’s what I did…I stamped the egg twice, coloring the top and middle on one, and the bottom only on the second.  I cut out the pieces, leaving the black line at the base of the crack for the top piece and the black line at the base of the crack for the bottom.  I stamped the chicks twice on the white cardstock, omitting the bottom of the chick on the right.  I placed three pop dots on the bottom half of the egg and adhered that over the colored chick.   I placed pop dots on the back of the top part of the egg but did not expose the second side of adhesive.  Those pop dots serve only to pop up the piece.  I poked a needle through the left dot (and through the pop dot on the back of that first spot), positioned that piece over the chick and then poked the needle through the hole and through the white cardstock.  After inserting the brad, I used my scissors as a spacer before tightening the prongs of the brad.  That way the brad doesn’t squish down the pop dot and the top part of the egg is able to swivel smoothly.  (I hope all of that made sense.)

Here’s what the card looks like with the egg closed.HEC300

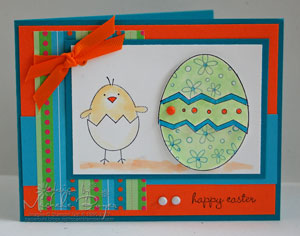
Thanks so much for stopping by…again.  Have a great day!! 🙂

Cardstock:  Taken with Teal, Only Orange, Tempting Turquoise, Whisper White    Patterned Paper:  Dots and Dashes (retired)    Stamps:  A Good Egg, Karen Foster snap stamps (“peep”)   Ink:  Basic Black, Gable Green, Taken with Teal, Pumpkin Pie, Barely Banana   Accessories:  Tempting Turquoise and Only Orange markers, white gel pen, eyelet, Crop-a-dile, brads, ribbon, dimensionals, aquapainter.  Card size 5 ½”x 4 ¼”.  All supplies Stampin’ Up! unless otherwise noted.

Happy Thanksgiving

HTPGood morning!  I don’t have a card to celebrate Veteran’s Day, but  I would just like to mention our veterans today and send out a big thanks and big hugs to them for  their dedication to our country!! 

This was one of the cards we made at my last workshop.  It’s a lot like the Happy Pumpkins, but without the faces (ha!).

I love watercoloring these sketchy images on watercolor paper. It’s so forgiving and easy to shade.

To make the little curlies, I just wrapped a very thin strip of cardstock around my needle, then glued the top ends and placed a tiny dot of glue at the other end so the cardstock wouldn’t unwind.

Thanks so much for stopping by!  Have a great day! 

Cardstock:  Really Rust, Chocolate Chip, Garden Green, watercolor paper     Patterned Paper:  Apple Cider DS paper     Stamps:  Autumn Harvest, Canvas     Ink:  Stazon Black, SU Pumpkin Pie, Really Rust, Summer Sun, Close to Cocoa, Olive Green     Accessories:  Jumbo Pewter eyelets, hemp, mat pack/needle, Chocolate Chip marker, dimensionals, water brush, sponge.  Finished card size 5 ½”x 4 ¼”.

Hey Sugar–Take Two

WWPP

Sugar sugar, honey honey…I cannot get that song out of my head now.  Aaaaaah!

Lindsey, Trudee, Julia and I decided to do a Take Two this time using Cosmo Cricket’s new Hey Sugar line and any flower stamps.  I thought I should look in my Stampin’ Up sets since it’s been eons since I’ve used one of them.  I first gravitated toward my beloved Petal Prints, but then I thought “No, you WILL use Pick a Petal.  You bought it, you HAVE to use it.”  So I did.  (At least now I can say I’ve used it twice.  I’m not a big fan of this set, but when I first saw it, I “had” to have it.)

I stamped the petals directly onto the patterned paper, cut them out and arranged them on the back side of another pattern from the collection.  I wanted a couple of the petals to extend “outside of the box” (just because I like to do that) and the flower center is raised on a dimensional.  There isn’t really much more to say about this card.  It’s a bit busy, but I think I like it.

Don’t forget to pop on over to see what Julia, Lindsey and Trudee have come up with!  I can’t wait to see for myself!  (And for a little enabling, Lindsey has about 200  items in her store at 20% off until Monday…just fyi.)

Also, my good buddy, Dee, is having a blog give-away.   Click here, scroll down just a bit and you’ll see it!!  

Thanks for stopping by! Have a great weekend!!

Cardstock:  Chocolate Chip, Very Vanilla     Patterned Paper:  Cosmo Cricket Hey Sugar “Be Mine,” “Honey Honey” and “Sweet Nothings”     Stamps:  Pick a Petal, Hugs & Wishes     Ink:  Basic Black     Accessories:  Jumbo Antique Brass eyelet, brown organdy, dimensional.  Finished card size 4 ¼” x 5 ½”.

SU-Take Two!

TFSY2

Time for another Take Two with Lindsey, Trudee and Julia!  Our challenge was to use any new Stampin’ Up set and Stampin’ Up patterned paper.  I decided to go really simple with this one, but I did try to add an extra bit of detail.

After stamping the little hedgehog, I used a Close to Cocoa marker to trace (with the brush tip) each little pair of lines on his body.  Then I filled in a bit with a Creamy Caramel marker, leaving a little of the vanilla paper showing.  His face is Caramel as well, and the butterfly is Pretty in Pink with a Barely Banana body.  

CU1I stamped him a second time and colored and cut out the ear and butterfly.  The ear is popped up on a rolled glue dot with the one end squished down to his face so the back of his ear only pops up.  I did the same thing with the butterfly, placing a rolled glue dot under its wings, then a dot of glue under its body. I used my scissors to push his body to the paper so that only his wings are elevated. Then I used a gray Copic to add a bit of shadow.

I used a super-simple layout, added some faux stitching and scalloped ribbon.

Be sure to check out Lindsey, Trudee and Julia‘s blogs to see their creations!  Thanks for stopping by and have a great day!

Cardstock:  Chocolate Chip, Very Vanilla     Patterned Paper:  SU Spring Flowers     Stamps:  Fun & Fast Notes     Ink:  Brilliance Graphite Black    Accessories:  Close to Cocoa, Creamy Caramel, Pretty in Pink and Barely Banana markers, mat pack/needle, white Signo gel pen, ribbon, Copic Warm Gray (W5) marker, glue dots.  Finished card size: 5” x 5”.

Boo!

st1When I peeked at the color challenge today over at SCS, I just had to try it…Always Artichoke, Purely Pomegranate and Taken with Teal.  I must say I would *never* have put these colors together, but I really like them! 

I’m in the process of reorganzing my stamp area (I’m actually moving it), and at the bottom of a bin, I found my most favorite Halloween set ever– Sweeter Treaters, so I thought I’d give it a whirl with these non-traditional colors.  I guess I did cheat just a bit in using Close to Cocoa and Creamy Caramel for her hair and face, but I didn’t want a sickly artichoke colored witch.  I wanted her healthy and cute. 🙂

I knew I’d never find patterned paper to match (especially one that would pass for Halloween), so I pulled out my Canvas background stamp, blew the dust off and inked it up.  I’ve become so incredibly lazy with all the patterned paper available.  My poor background stamps have been severely neglected.

I must run my son to a doctor’s appointment.  Thanks for stopping by!!  Have a great day!

Cardstock:  Always Artichoke, Taken with Teal, Purely Pomegranate; Papertrey Ink white     Stamps:  Sweeter Treaters, Canvas     Ink:  Brilliance Graphite Black, Taken with Teal, Always Artichoke, Purely Pomegranate, Close to Cocoa, Creamy Caramel     Accessories:  Scrap of black grosgrain, black brads, “boo” brad by Queen & Co., gray Copic marker (C-3), black Stampin’ Write marker, aquapainter, dimensionals.  Finished card size 4 ¼” x 5 ½”.

Happy Halloween from the Pumpkins!

HHPI’m having fun with this set!  I know there are a lot of people out there who don’t like it, but I sure do!  I decided to let the Pumpkin’s (yes, that’s their last name) personalities show here.  We have Pappa Pumpkin who is in desperate need of an eyebrow and mustache trim, Mama Pumpkin with her fancy stitched ribbon, little boy pumpkin and the little girl who wants to be just like Mom…all here to wish you a Happy Halloween! lol.  (It’s just another one of those strange things that pop into my head. I can’t explain it.)

I stamped the kids first, masked them, then stamped Mom and Dad.  After coloring everyone, I realized the image as a whole was a bit large so I cut the border so the pumpkins extended past the edge of the paper, faux stitched and mounted onto Chocolate Chip.  I knew I wanted a bow on the girls’ stems, but I wasn’t sure what to do with the dude.  Hmm…the more I looked at those leaves, the more they looked like mustaches.  Once I was in “hair mode,” I realized I could make some eyebrows as well.  The three pieces (of hair) are all popped up on dimensionals.  I punched holes on each side of Mom’s stem to tie the ribbon, but the girl’s is attached with a glue dot.

That very cool paper is from the new Basic Grey Mellow 6 x 6 paper pad.  Of all the new Basic Grey lines, Mellow is my favorite.  I’m certain you’ll be seeing more of it!

Thanks for stopping by!!! : )

Cardstock:  Chocolate Chip, Very Vanilla     Patterned Paper:  Basic Grey Mellow 6 x 6 paper pad     Stamps:  SU Autumn Harvest, Autumn Apparitions     Ink:  Stazon Black, More Mustard, Pumpkin Pie, Old Olive, Close to Cocoa, Barely Banana     Accessories:  Ribbon (May Arts), mat pack/needle, Chocolate Chip marker, aquapainter, dimensionals.   Finished card size 5 ½” x 5 ½”.

Road Card Pumpkins

AHMy favorite weekly challenge on Splitcoast is the sketch challenge.  Every Wednesday I take a peek whether I have time to play or not. 

I often feel “layout challenged” so sometimes this is just the push I need. 

I’ve been wanting to use these pumpkins…I really like how “sketchy” they are.  This type of design is great for watercoloring.  You can be a bit messy and it doesn’t often show.  I used watercolor paper here and a whole lot of Earth Elements inks.  (There was quite a pile on the table before I was finished.)  I like watercoloring on watercolor paper best because I can keep adding layers of color without ripping through the paper.  (I do NOT like SU’s Whisper White cardstock for this type of coloring, but I do use it…carefully…once in a while.)  I distressed the edges and added some leaves, some popped up on dimensionals. 

I have to mention the patterned paper…You can’t see much of it, but it’s by Flair Designs.  They have some gorgeous fall and western prints.   You can check them out here.

I almost *always* include a sentiment on my cards so for me, this card is missing something. It looks kind of naked without a message, but I’ll have to settle for the message being on the inside as I left no room for words.

One final note, in case you haven’t been over there already, you may want to check out Trudee‘s blog.  She’s having an incredible give-away!

Thanks for looking!!  Have a great day!  🙂

Cardstock:  More Mustard, Really Rust, watercolor paper     Patterned Paper:  Flair Designs “Fall Traditions”     Stamps:  Autumn Harvest, Canvas     Ink:  Brilliance Graphite Black, More Mustard, Really Rust, Summer Sun, Pumpkin Pie, Old Olive, Close to Cocoa, Ruby Red     Accessories:  Karen Foster Thumbtack brads, linen thread, edge distresser, dimensionals.  Finished card size:  5 ½” x 4 ¼”