Category Archives: Stampin’ Up!

Color Challenge (or so I Thought)…and the winner is…

TF1

Well, I thought I was doing this week’s color challenge, but I must not have had both eyes open when I looked at the challenge.  I thought for sure the colors were Blue Bayou, Chocolate Chip and River Rock.  Nope.  It’s Sahara Sand.  Oh well.  (I like this combo too!)

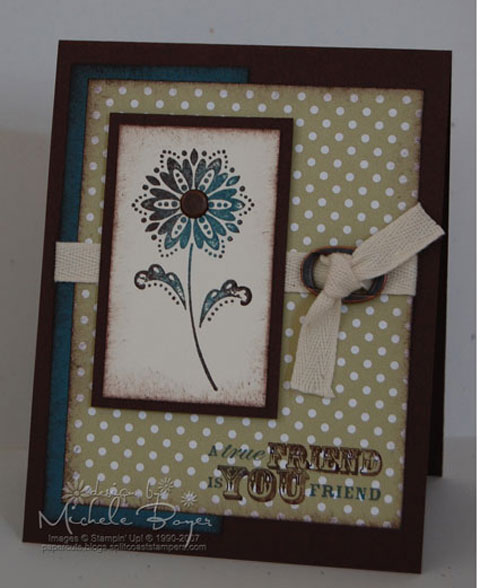
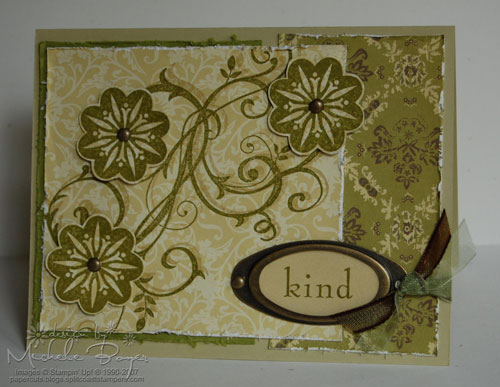
I liked the mottled look I got on my Webster’s Goes Western card (from a few days ago), so I decided to try the same type of thing here.  I first inked the flower stamp with Blue Bayou then put the inked stamp directly into my Chocolate Chip pad.  I like the different looks you get combining different ink colors.  (Just be sure to always ink with the lighter color first!!)

The dotted paper is from SU’s new Apple Cider designer series paper.  I sponged the edges here a bit with Chocolate Chip.

For the sentiment, I inked the smaller words with Blue Bayou, trying to keep the ink off of the bigger words (but not trying *too* hard), then I used my Chocolate Chip marker to go over those.

Now…about this give-away, I have been totally (and I mean *totally*) overwhelmed with the number of responses and the VERY kind words.  I really do appreciate you guys coming here to read my thoughts and see what I’m doing.  I’ll try to answer all of your questions soon!! HUGS!!!  

And the winner (determined by random draw) is #288 Sharlene Wale!  Please email me with your address!!!  And CONGRATULATIONS!!! 

Thanks for looking, everyone, and have a great day!!

Cardstock:  Chocolate Chip, Blue Bayou, Very Vanilla     Patterned Paper:  Apple Cider DSP     Stamps:  True Friend     Ink:  Chocolate Chip, Blue Bayou     Accessories:  Twill, aged copper hodge podge buckle, Karen Foster thumbtack brad, Chocolate Chip marker, sponge, dimensionals.  Finished card size: 4 1/4″ x 5 1/2″.

Gotta love the Reindeer :)

Well, my holiday pre-order came the other day.  I have to say I LOVE that Stampin’ Up! has die cut all of the mini sets.  It was so nice to just pop out the rubber and stick it to the wood!

temp removeOne of my favorite sets in the new mini is Merry & Bright.  I had to play with that one first.  This little reindeer is just the cutest!   Here I paired him with Cosmo Cricket’s new Christmas line, Be Good.  If you like the distressed look, you’ll love this paper.  It’s already distressed.  Less work for me! (I did add a bit of sponging though…I couldn’t hold myself back. )

I used the reverse side of the red print paper to cover the card front (base is Vanilla cardstock).  I could have used Chocolate as the base, but I wanted some of that pre-distressed look to show around the edges.  I used Copics to color the image.  I’m not feeling the love of these markers yet, but I’m trying.

After assembling the card, I added the three eyelets.  I make an effort not to have metal prongs and such come through the card, showing on the inside, but I do like the look of eyelets going through all layers (super easy with a Crop-a-dile).  Lastly, I added a few faux stitches on each side of the sentiment and along one side of the lighter patterned paper. M&B500

I wanted to try a completely different, brighter look too, so for this one I used Real Red and Green Galore.  It doesn’t show well in the photo, but I used a sparkly red Stardust gelly roll pen for the dots on the trees and the reindeer’s nose.

Thanks for stopping by, and if you haven’t done so already, scroll down one post to enter my give-away!  Have a great day! 🙂

Believe card     Cardstock:  Very Vanilla     Patterned Paper:  Cosmo Cricket Naughty or Nice Be Good “Peppermint Candy” and “Poinsettia,” sentiment strip from “Strip Tease”     Stamp:  Merry & Bright     Ink:  Brilliance Graphite Black, Ranger Walnut Distress     Accessories:  Copic markers, K & Company rhinestone, mm eyelets, mat pack/needle, Chocolate Chip marker, Crop-a-dile.  Finished card size:  4 ¼” x 4 ¼”

Merry & Bright card     Cardstock:  Green Galore, Real Red, Papertrey Ink white     Patterned Paper:  American Crafts Truly Inspiring     Stamp:  Merry & Bright, Itty Bitty Backgrounds     Ink:  Brilliance Graphite Black, White Craft     Accessories:  Copic markers, Red Stardust Gelly Roll pen, Black marker, ribbon.  Finished card size:  5 ½” x 4 ¼”

Webster’s Goes Western

Warm Wishes

While I (impatiently) await my holiday pre-order, I thought I’d use one of my favorite new patterned papers, Webster’s Pages.  As I mentioned before, I came across this gorgeous heavyweight paper at CHA.  Terri Conrad is the artist behind the designs and she is just as sweet as she is talented. 

This particular pattern is from her “Parlor Collection.”  (My absolute favorite though is the CoCo Collection…Chocolate Souffle, Graham Cracker, Fresh Baked…yum!)  You can find the entire line here.  I think Lindsey ordered just about everything they had! 

I stamped the horse first in Chocolate Chip then decided it wasn’t quite right.  So I stamped it again (on another piece of cardstock) in Really Rust.  Still not right.  Third time’s a charm…I inked the stamp with Really Rust, then put the inked stamp onto my Chocolate Chip pad and WA-LA!  I was happy!  (But I do believe that horse is sticking out his tongue!)

I had to add the three brads at the bottom because first of all I thought the card still needed something, but secondly, it’s for a brad-crazed gal so I had to use at least a few.  (I hope she likes it.)

Be sure to come back tomorrow.  Let’s hear it for my first give-away!! (That was a clue!) 🙂

Cardstock:  Really Rust, Chocolate Chip, Very Vanilla     Patterned Paper:  Webster’s Pages Parlor Collection “Southern Comfort”     Stamps:  Wanted, Baroque Motifs, Hugs & Wishes     Ink:  Really Rust, Chocolate Chip     Accessories:  Antique brass hodgepodge, mat pack/needle, Chocolate Chip Stampin’ Write marker, sponge, ribbon (MME Wild Asparagus), hemp.  All supplies Stampin’ Up!  Finished card size 5 ½” x 4 ¼”.

My Long Lost Moose :(

Moose You

This was my swap card for Jami‘s New Stamp Set swap. I say “was” because the USPS managed to lose the box and my eleven cards, return postage and a gift for Jami are somewhere betweeen here and California.  I felt badly enough that my time and supplies were wasted, but I feel even worse that others are now getting slighted because of the loss.  Nothing to be done though, I suppose.  I allowed plenty of time for the package to arrive. 

I used Chocolate Chip for my base (no shock there, eh?), using the same color ink and Canvas for the background. The patterned paper is from SU’s new Outlaw dsp.  All edges (except the horizontal strip) are sponged, and I added the three little knots of linen thread, using the mat pack to evenly space the stitches.

I keep hoping that sometime soon my box will appear and I’ll be able to get the cards to those in my swap group.  But if not….I’m sorry! 🙁

Cardstock:  Chocolate Chip, Very Vanilla     Patterned Paper:    Outlaw designer series paper     Stamps: Moose You, Canvas   Ink:  Chocolate Chip     Accessories:  Mat pack/needle, linen thread, sponge.  All supplies Stampin’ Up!   Finished card size: 5 ½” x 4 ¼”

WANTED…Road Cards

WishThere are only two more days of Dare To Get Dirty challenges at Splitcoast Stampers!!  Today, my challenge is to Distress your Best!! 

As many of you know, I love distressing.  And many of you know about the standing “joke” with my husband about this style.  He is quick to point out that although he doesn’t “hate” them, he thinks my distressed cards look like they’ve been in the road, in the weather, for days.  So we now jokingly call distressed cards “road cards.”  I don’t mind.  I kind of like the name. 🙂  So, how could I resist challenging others to make the same!

I used Stampin’ Up’s new Wanted set and new Outlaw designer paper.  What a perfect match!  I heavily distressed the edges, faux stitched and sponged it nice and dirty.  🙂

One of my little “tricks:”  When I use faux stitching with distressing and sponging, one thing I always like to do is slightly fold the paper on the “stitched” line and sponge as if that fold were an edge.  That way I get a little darker area along that line.  (You can see this on the inside stitched lines around the horse.)

Thanks for stopping by!!  Do YOU dare to get dirty?  🙂  Come play!!

Cardstock:  Chocolate Chip, Very Vanilla    Patterned Paper:  Outlaw    Stamps:  Wanted, Everyday Flexible Phrases    Ink:  Chocolate Chip, Ranger Walnut Distress    Accessories:  Karen Foster Thumbtack brads, hemp, edge distresser, mat pack/needle, Chocolate Chip Stampin’ Write marker, sponge

Stuck on You (More Moose You)

SOY1

I think this set is adorable!!  I don’t know why…I just really like it.  This little porcupine cracks me up.  Love those little needles!  🙂 

Here’s another very simple card.  One stamp set, one ink, patterned paper, a little faux stitching .  I knew I wanted stitching on this card, but I couldn’t decide which style to choose.  I like how this one kind of mimics the porcupine’s needles.  Add a couple hearts…the heart on top is raised on a piece of a dimensional, then the two were tied together with a bit of linen thread.  The porcupine is raised on dimensionals as well.  Done.  (I seem to be in a mood for “simple” lately…hope you don’t mind!)

Thanks for looking!  And happy Friday!

     Cardstock:  Chocolate Chip, Very Vanilla

     Patterned Paper:  Basic Grey Infuse (paper pad)

     Stamp:  Moose You

     Ink:  Chocolate Chip

     Accessories:  Linen thread, mat pack/needle, Chocolate Chip marker, dimensionals

     Finished card size: 4 1/4″ x 4 1/4″

Moose You So Much!

MY2I think this set is so much fun!  I made a moose card for a swap, but I can’t show you that one yet so I thought I’d make another.  (My favorite stamp in the set is the little porcupine.  I have a few ideas for him, but he’ll will have to wait.) 

I had a bit of a hard time getting a solidly stamped image of this moose.  I don’t have many craft ink pads.  Maybe that would work better, but then I’m not the most patient person when it comes to waiting for ink to dry.  I think for now I’ll settle for a few little uninked spots.

This card is really simple.  I used Basic Grey’s new Infuse line, the paper pad.  I prefer the 6″ x 6″ paper pads to the 12″ x 12″ because the prints in the pad are scaled down for the smaller size.  Perfect for card making!

I blew the dust off of my hodgepodge tin to pull out an antique brass buckle.  Then I dug through my bin of ribbon to find the twill.   I don’t know why I haven’t used these two items for so long.   I actually really like them!

Just a side-note comment, I’m happy to see that SU now has refills for the antique brass and pewter brads, but what about the aged copper?  They’re my favorites!  I need refills! 🙂

Thanks for stopping by!

     Cardstock:  Chocolate Chip, Very Vanilla
     Patterned Paper:  Basic Grey Infuse paper pad
     Stamps:  Moose You
     Ink:  Chocolate Chip
     Accessories:  Twill, antique brass hodgepodge buckle, dimensionals, mat pack/needle,
     Chocolate Chip Stampin’ Write marker
     All supplies (except patterned paper) Stampin’ Up!  Finished card size 5 ½” x 4 ¼”.

Black Tie Only (and pearls)

TF1So I’ve been trying to come up with something new for these birds…JanTink said they looked constipated (I still find that incredibly hilarious), Jen70 used them for a get well card (marvelous idea)…I decided to make them into a nice little “aged” couple off for their anniversary dinner.  When I showed it to my husband to get his opinion (which is not always a good idea as you will soon find out), he said it’s missing the chain.    Funny guy. 

…Anyway, I kept this card pretty simple as it will be one we make at my workshop this week.  We may have to forego the actual “tie” tying of the ribbon, but we shall see. 

The background is a pattern from SU’s Petals & Paisleys designer series paper.  I have GOT to use up some of this paper (not “this” specific paper, but ALL my paper.  I have quite a stash)! 

I gave the little aged bird man a tie and the lady some pearls (afterall, they ARE going somewhere fancy…and you can only do so much to a bird).  I drew in the tie and the pearls with a black marker, then used a white gel pen to color in the pearls.  The sentiment is from the new Fun & Fast Notes set.  I think that set is adorable, but I just wish the sentiments were a little more bold.

I used the mat pack to space the brads evenly and the main image is raised on dimensionals.  AND I’ve accomplished my goal.  I’ve used ALL the animals from Zoofari. lol.

Thanks for looking!  Have a great day!

     Cardstock:  Old Olive, Black, Confetti White

     Patterned Paper:  Petals & Paisleys DSP

     Stamps:  Zoofari, Fun & Fast Notes

     Ink:  Black, Barely Banana, Apricot Appeal, Old Olive, Going Gray

     Accessories:  Black grosgrain, Vintage brads, black marker, Signo white gel pen,, mat pack,

     dimensionals, aquapainter

     Finished card size: 4 1/4″ x 4 1/4″.  All supplies Stampin’ Up!

Finally, Baroque works!

KB1Hello! I hope everyone enjoyed their Fourth yesterday! We had a big picnic at my brother’s house and then fireworks at dusk. I think it was the first time in several years we didn’t have a storm as well. It was nice not being soggy and sweaty for once. We actually had great weather! I was up way too late though. ***yawn***  But we had a great time!

About Baroque Motifs…I really do love this set, but it hasn’t been loving me.  I’ve had a terrible time with it… this and Pick a Petal (but that’s another story).  When I saw Baroque Motifs in the SU preview mini, I was on the fence about getting it.  I’ve always admired this style, but it’s out of my comfort zone.  Then I saw all the gorgeous cards by Jeanne S and that was it.  Now I have my own personal challenge to use this set and be happy with it.  (I’m pretty happy with this one.)

I used another of my favorites of the new In Colors, River Rock, and the new Brocade Background patterned paper. 

The first time I stamped the big swirl, I used River Rock then, using a Stamp-a-ma-jig, I stamped it again with Old Olive.  I really like that shadow look.  The flowers were stamped in Olive onto a piece of the same River Rock background pattern then cut out.  I distressed all the edges (because that’s what I like to do 🙂 ) and added the hardware and ribbons (narrow celery organdy by Stampin’ Up, darker ribbon by May Arts available here). 

Overall, I’m really happy with how this turned out, but if I were to do it over again, I’d add some subtle swirls in River Rock with the Olive sentiment stamped over the swirls, but I’m not ripping it apart to do that.  (I thought about it though.)

Thanks for looking!  Have a great day!

     Cardstock:  River Rock, Old Olive

      Patterned Paper:  Brocade Background

      Stamps:  Baroque Motifs

      Ink: River Rock, Old Olive 

     Accessories:  Antique Brass Hodgepodge, narrow Celery organdy, darker ribbon May Arts,

     Stamp-a-ma-jig, edge distresser, large oval punch

     Finished card size:  5 1/2″ x 4 1/4″.

     All supplies Stampin’ Up! except May Arts ribbon.

Birthday Hugs

Birthday Hugs

I was so happy to see that Emily selected colors from the new Basic Grey Infuse line for the color challenge today at SCS!  Gorgeous papers!!  I got mine from Jacksonbelle Embellishments.  (The ribbon is from there too!)

I used Stampin’ Up’s new Onboard Blossoms and Basics chipboard for the flower.  I was trying to figure out how to somewhat duplicate the center of the flowers on the patterned paper when I looked across my messy table to see Baroque Motifs.  (I love that set, it’s so pretty, but for some reason I’m having a hard time with it.)  Anyway, I used the flower image for the center of the chipboard flower.  Close enough for me!  Then I just punched a 1/4″ circle from the pink paper for the dot in the center.

Thanks for looking!! 🙂

     Cardstock:  Confetti White (base), Very Vanilla (flower center)

     Patterned Paper:  Basic Grey Infuse

     Stamps:  Baroque Motifs, Hugs & Wishes

     Ink:  Chocolate Chip, Brilliance Graphite Black

     Accessories:  Onboard Blossoms & Basics, Basic Grey Precision File set, ribbon, sewing

     machine/thread, ¼” circle punch