Monthly Archives: June 2018

Oh the Places You’ll Go (stamping bella)

Hello everyone! It’s time for another challenge with Stamping Bella! This week we’re using images from the latest release. I chose one of the four super sweet Squigy Pals. 🙂

Stamping Bella Squidgy Pals and Rosie & Bernie Plan a Trip

I also used only the suitcase portion of Rosie and Bernie Plan a Trip.

Stamping Bella Squidgy Pals and Rosie & Bernie Plan a Trip (close up)

Copic markers – E00, E01, E11, E30, E31, E33, E35, E37, E40, E42, R14, R22, Y17, Y21, YG03, YG06, YG09, YG17, YR21, YR23, W2, W4

I placed map paper inside a stitched circle then tacked an Adventure Sentiment using my Tim Holtz Tiny Attacher.

Below are two cards I’ll soon share on Instagram. 🙂

Stamping Bella Rosie and Bernie in Hawaii and Rosie and Bernie's Palm Tree

Copic markers – BG10, BG11, BG13, C00, C1, C2, C3, E01, E11, E23, E25, E27, E33, E35, E37, E40, E41, E51, G12, G14, G28, N9, R83, R85, RV11, RV17, RV19, RV32, RV69, Y06, Y19, 110

My care above uses Rosie & Bernie in Hawaii with Rosie & Bernie’s Palm Tree and a Summer Sentiment.

Stamping Bella Amanda is Awesome

Copic markers – BG0000, BG10, C00, C1, C2, C7, E00, E01, E11, E13, E30, E31, E33, E35, E37, G28, G40, G43, G46, R0000, R000, R00, R12, R22, R83, R85, RV32, Y0000, Y000, Y21, Y32, YR23, 110

Here, I’ve used Tiny Townie Amanda is Awesome with a sun from Littles Ice Cream & Lemonade.

NEXT WEEK’S CHALLENGE

Use any current Stamping Bella image. (No restrictions.) If you’d like, email your card to [email protected] by next Thursday to be featured on the SB blog. By doing so, you’ll also be entered to win some Bella Bucks! All challenge details can be found HERE.

Thanks so much for visiting today!

1amichele siggy

Thanks for Your Service (paper smooches)

Hi everyone! I’m just now back from a whirlwind of graduation celebrations, company and vacation. It has been a C-R-A-Z-Y month. I think things will slow down a bit now but I feel behind. I need a vacation after the last three weeks…and yes, a vacation from my vacation. It was not all good. But everyone is ok (now). Thankfully.

Today I have a fun card to share using Circle of Honor from Paper Smooches.

Paper Smooches Circle of Honor

I stamped the fireworks in red and light blue inks then added the perfect embellishments, new Starbursts, from Queen & Company.

Paper Smooches Circle of Honor (close-up)

Copic markers – B28, E18, E33, W00, W1, W2, W3, Y17, Y21, YR23

I applied red, silver and blue Pin Stripe Glitter Tape (currently on sale), then adhered my Copic colored eagle. Quick and easy.  🙂

Thanks so much for visiting today! I’ll be back soon!

1amichele siggy

One Last Stamping Bella Preview – Little Bits Florals

Hello!  I have one final sample to share from Stamping Bella‘s June 25 release. Today I used new Little Bits Florals with one Little Bits Critter.

Stamping Bella Little Bits Florals and Little Bits Critter

After stamping and coloring with markers, I added white dots with a Kirarina Wink White Pearl pen. (You probably know by now that I love that pen.)  🙂

B0000, BG11, BG13, C00, C1, C5, C7, R24, R29, R83, RV32, Y21, Y32, YG03, YG06, YG09; Kirarina Wink White Pearl pen

Copic markers – B0000, BG11, BG13, C00, C1, C5, C7, R24, R29, R83, RV32, Y21, Y32, YG03, YG06, YG09; Kirarina

I used a Flower Sentiment and Simple Stripes paper from Queen & Company.

Be sure to stop by the Stamping Bella blog today to see more previews of additional sets. And leave a comment there for your chance to win a prize!

Thanks for stopping by!  🙂

1amichele siggy


Stamping Bella Previews – More Florals and Fairies

BeFunky-collage-(3small)

Hello again! I’m back today with four more samples from Stamping Bella‘s June 25 release! Since it’s Friday, I also have this week’s color challenge. (It’s a super-long post so you’ll need to click on the Read More button soon.)

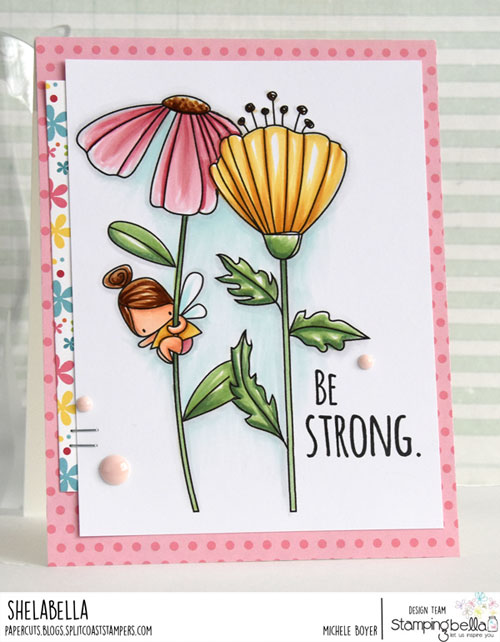
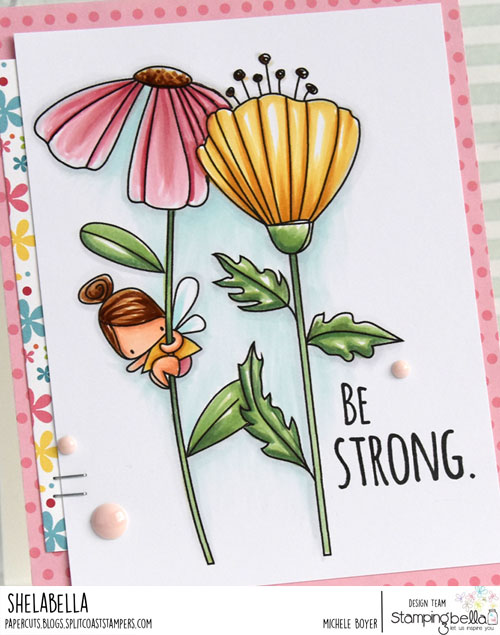
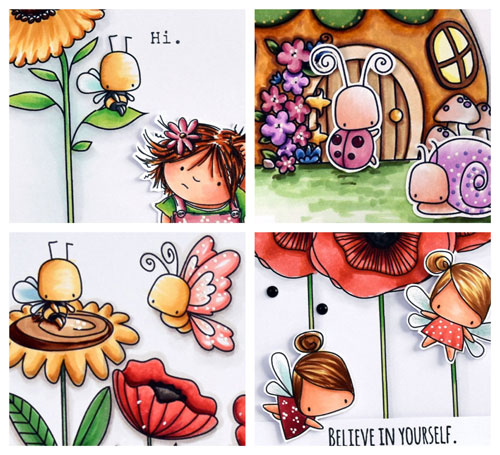
First, I used Straight Up Floral set with new Little Bits Fairies.

Stamping Bella Straight Up Florals and Little Bits Fairies

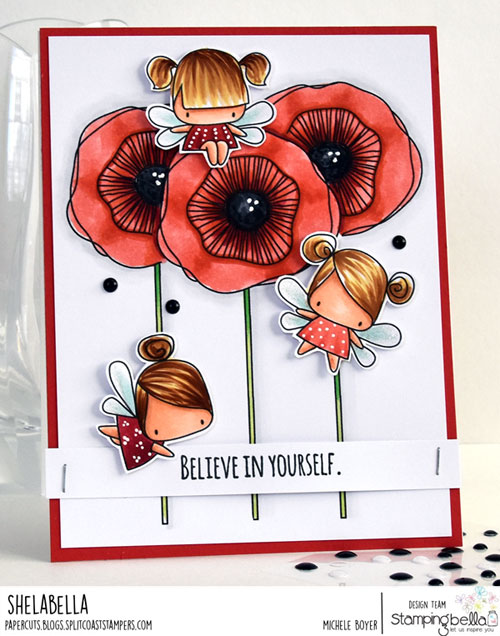
I stamped the flowers, first the center, then masked and stamped the left and right. The fairies were stamped, colored and cut out then adhered using clear foam squares.

Stamping Bella Straight Up Florals and Little Bits Fairies (close-up)

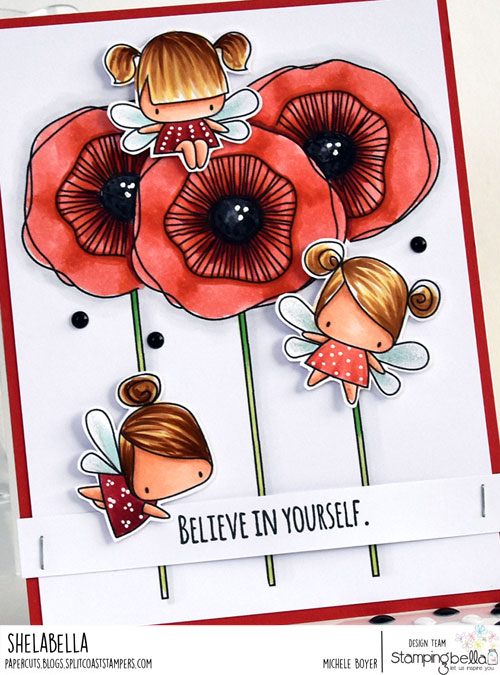
Copic markers – BG10, C00, C1, C6, E00, E01, E11, E31, E35, E37, N7, R05, R08, R22, R24, R37, R39, Y21, YG03, YG06, YG09, 100; Kirarina Wink White Pearl pen

I added a Dragon Sentiment then a few Epoxy Dots and Kirarina Wink white dots.

Stamping Bella Floral Forest Backdrop

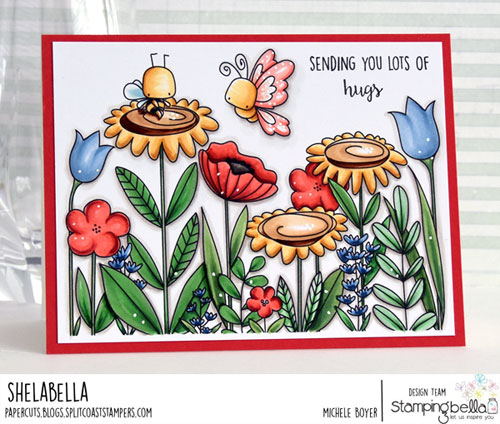
Next I used lovely new Floral Forest Backdrop with a couple Little Bits Critters added in. The sentiment is from Tiny Townie Bonnie Loves Bows.

Stamping Bella Floral Forest Backdrop (close-up)

Copic markers – B24, B91, B93, B95, B97, B99, E30, E31, E33, E35, E37, G12, G14, G24, G28, G43, G46, R000, R00, R21, R22, R24, R39, W00, W1, W2, W3, W5, W7, W9, Y23, Y32, YR23; Kirarina Wink White Pearl pen

I stamped and colored with markers then added Kirarina Wink white dots throughout.

Stamping Bella Little Bits Fairy House and Little Bits Critters

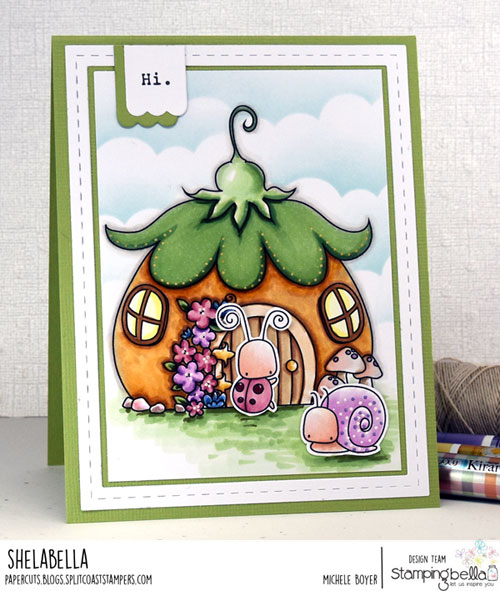
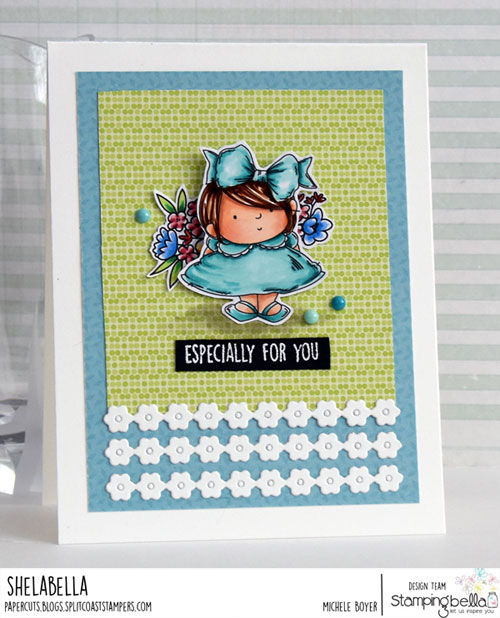
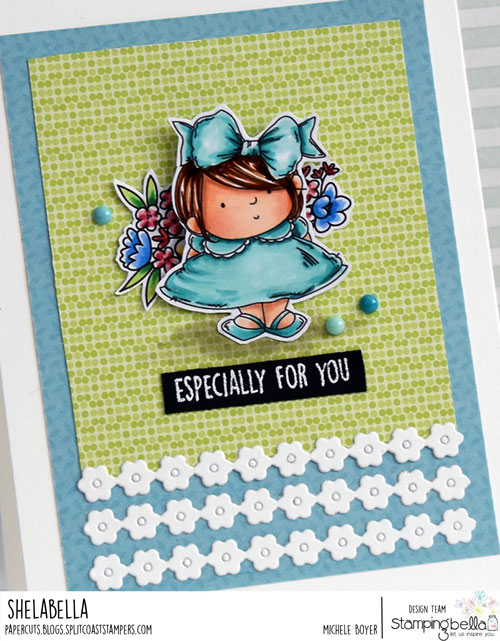
Here, I used new Little Bits Fairy House with the ladybug and snail from Little Bits Critters. Sentiment is from Tiny Townie Penelope Has a Pencil.

Stamping Bella Little Bits Fairy House and Little Bits Critters (close-up)

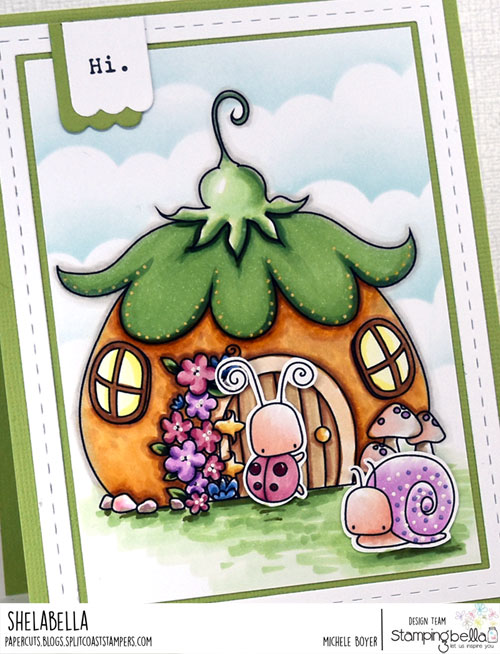
Copic markers – B24, B28, G40, G43, G99, E30, E31, E33, E35, E40, E41, E42, E43, R000, R00, R01, R83, R85, R89, RV32, Y21, V01, V12, V15, V17, YR23, W00, W1; Kirarina Wink White Pearl, Lilac and Dandelion pens

I used a cloud border to sponge the sky after stamping and coloring the house. Bugs were adhered using clear foam squares.

Stamping Bella Side to Side Floral Set and Squidgy Pals

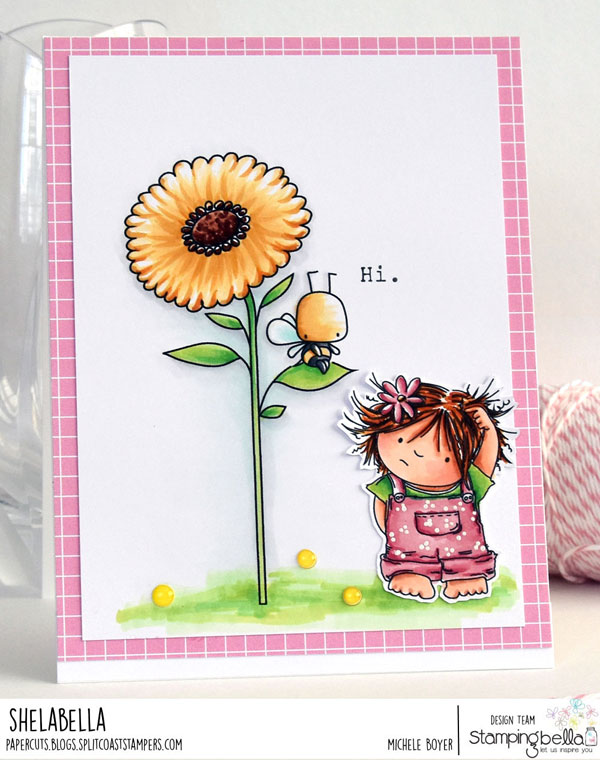
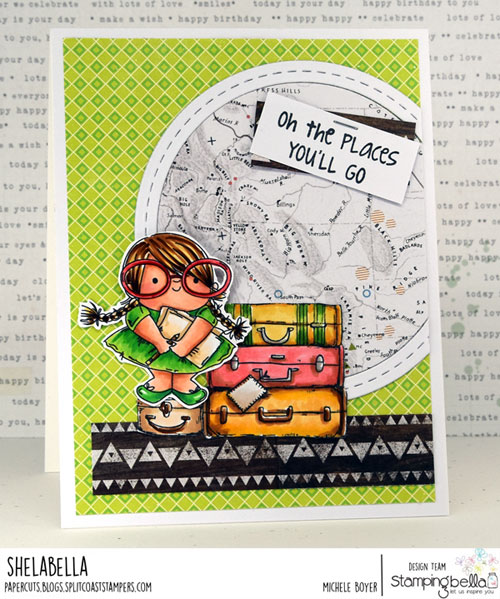
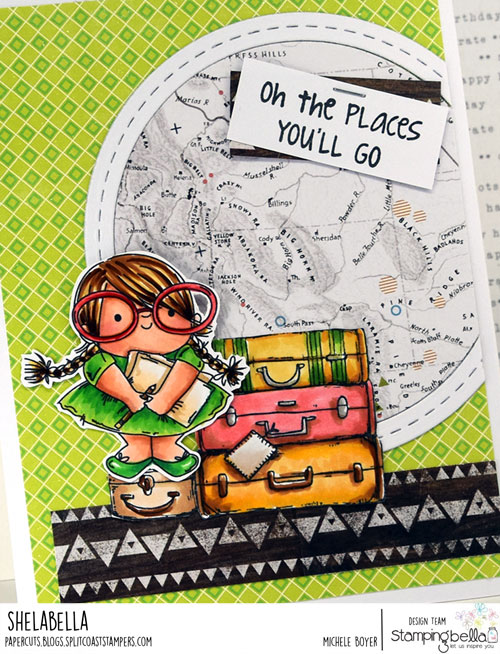
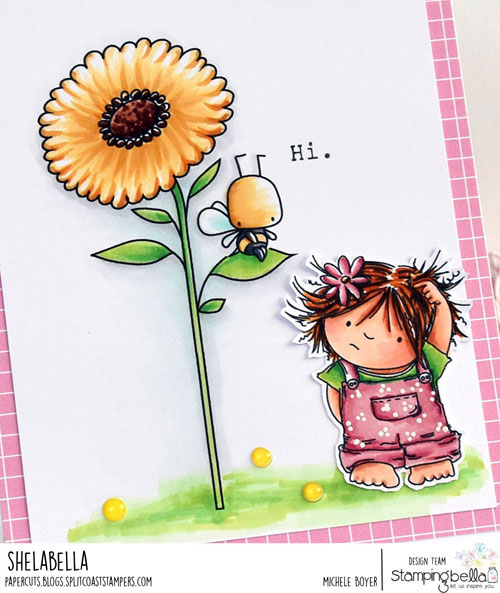
On my fourth preview, I used new Side to Side Floral set with another of the new Squidgy Pals and a Critter. Sentiment is from Tiny Townie Penelope Has a Pencil.

Stamping Bella Side to Side Floral Set and Squidgy Pals (close-up)

Copic markers – BG10, BG11, BG70, C00, C1, C5, C7, E13, E15, E18, E59, Y23, Y32, YG03, YG09, YG06, YG11, YR14, YR23; Kirarina Wink White Pearl pen

Side to Side Floral set includes the flower I used here plus another tall flower and a smaller/shorter one.

Once stamped and colored, I added a few Epoxy Dots and a white dotted pattern to the overalls.

Also today, I have this week’s color challenge. We were to use the photo at the bottom of this post as inspiration.

Stamping Bella Anabelle Needs Your Address

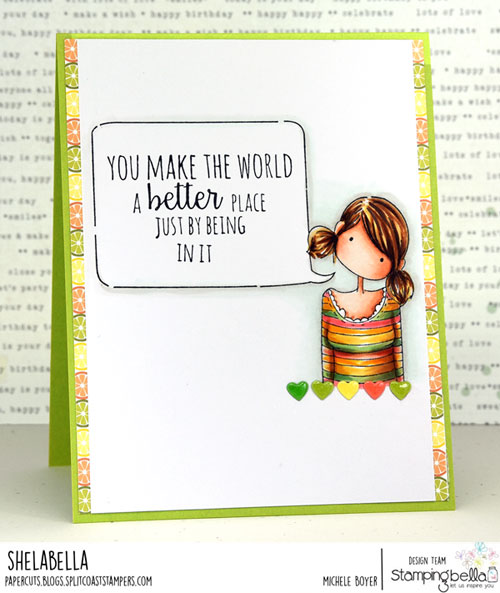
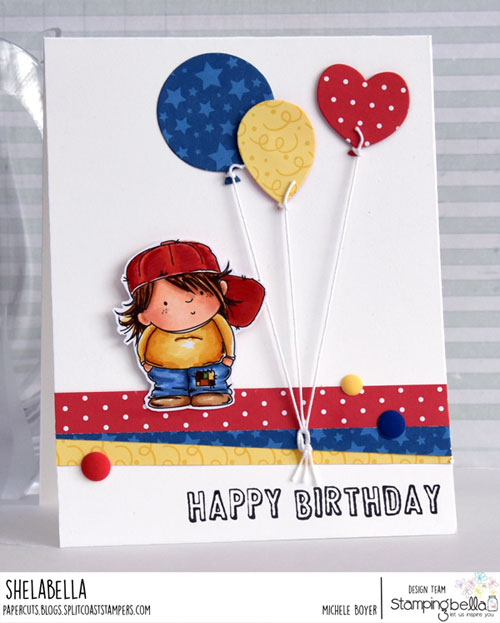
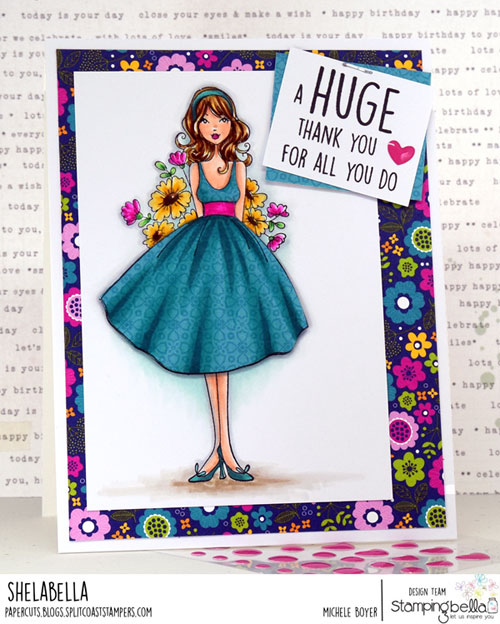
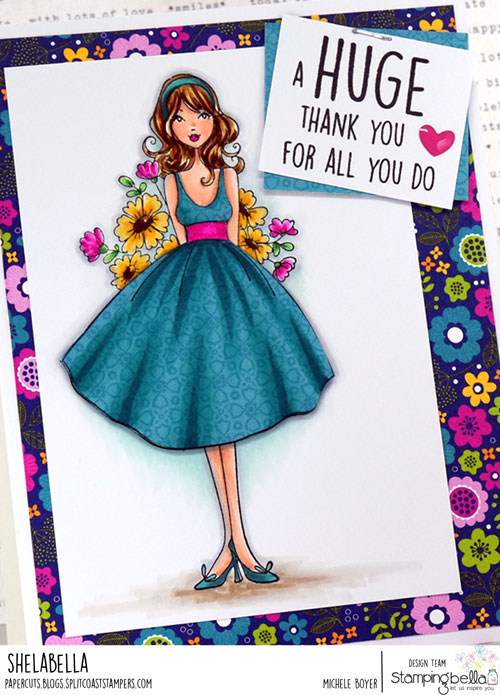
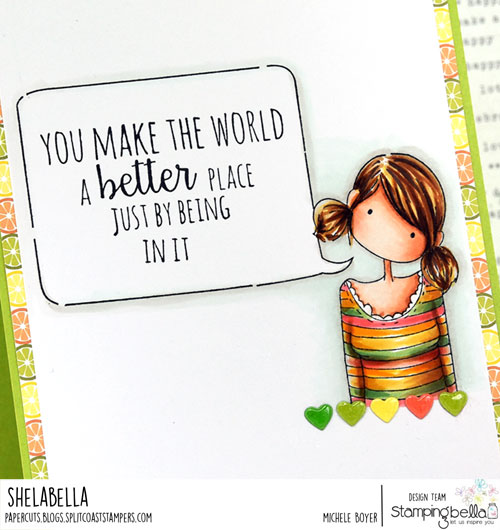
I used Tiny Townie Anabelle Needs Your Address with a sentiment from Bunny Pile Stuffies.

Stamping Bella Anabelle Needs Your Address (close-up)

Copic markers – E000, E00, E01, E11, E30, E31, E35, E37, E79, G0000, G43, G46, R01, R02, R14, R22, W00, W1, Y21, Y38, YR23

I colored with Copic markers then added a row of small die-cut hearts covered in Glossy Accents.

NEXT WEEK’S CHALLENGE

Use an image from the latest release.  If you’d like, email your card to [email protected] by next Thursday to be featured on the SB blog. By doing so, you’ll also be entered to win some Bella Bucks! All challenge details can be found HERE.

Be sure to stop by the Stamping Bella blog today to see more previews of additional sets. And leave a comment there for your chance to win a prize!

I’ll be back tomorrow with one final sample. Thanks for visiting today!  🙂

1amichele siggy

Stamping Bella Previews – New Floral Sets

Hi everyone! Today I’m sharing a card using two of Stamping Bella‘s upcoming June 25 releases – Daisy Floral and Straight Up Floral sets.

Stamping Bella Daisy Floral and Straight Up Floral Sets

Daisy Floral set consists of the image on the left (with the cute fairy) plus one additional flower. Straight up Floral set consists of the flower on the right plus one additional flower and a leafy branch.

Stamping Bella Daisy Floral and Straight Up Floral Sets (close-up)

Copic markers – BG10, BG11, C00, C1, E00, E01, E11, E31, E33, E35, E37, G43, G46, G85, R81, R83, R85, RV11, RV32, Y21, YR23

Once the flowers were stamped and colored, I added a sentiment from Dragon Sentiments. Pretty paper is from Picture Perfect by Queen & Company.

Be sure to stop by the Stamping Bella blog today to see more previews of additional sets. And leave a comment there for your chance to win a prize!

I’ll be back tomorrow with three final samples from the new release.  Thanks for stopping by!  🙂

1amichele siggy

Stamping Bella Previews – Squidy Pals and Goalies

I’m back today to share a few more samples from Stamping Bella‘s upcoming June 25 release. Today we have new Squidgy Pals and Goalie Squidgy.  🙂

Stamping Bella Squidgy Pals

Squidgy Pals is a set of four of the cutest little squidgies ever. Here I paired one with a peek at another new set which shall not be named until Saturday. (Shhhh, I snuck it in.)

Stamping Bella Squidgy Pals (close-up)

Copic markers – B16, B24, B66, B69, BG10, BG11, BG13, E00, E01, E11, E35, E37, G17, R01, R24, R39, R83, R85, RV32, W1, W2, W3, YG03, YG06, YG09

I colored with markers then white embossed a sentiment from Tiny Townie Ellie the Elf. The flower border is from Taylored Expressions’ Skinny Mini Borders 2 and patterned paper is Picture Perfect from Queen & Company.

Stamping Bella Squidgy Pals

Next, I used a second Squidgy Pal and Birthday Sentiment to create a boy birthday card.

Stamping Bella Squidgy Pals (close-up)

Copic markers – B93, B95, BV17, E00, E01, E11, E31, E33, E35, E37, G03, R01, R24, R29, Y21, YR23

I colored with markers, cut out and adhered over strips of Birthday Bash and Delightful Dots patterned paper from Queen & Company. Balloon dies are from Paper Smooches.

Stamping Bella Goalie Squidgy

And last but not least for today is new Goalie Squidgy. I am a H-U-G-E hockey fan, specifically the 2018 Washington Capitals Stanley Cup CHAMPIONS!  (#ALLCAPS #fanthroughthickandthin #superexcitingyear #itwasstressful) So I was happy to see this cute goalie.

Stamping Bella Goalie Squidgy (close-up)

Copic markers – B29, BG10, BG70, E00, E01, E11, E13, E15, E18, E31, E33, E35, E40, E42, E43, R29, R39, W00, W1, W2, W3

Of course I colored him in Washington Capitals colors (how could I not?) and used a Queen & Company black Epoxy Dot as the puck. Patterned paper is from Fruit Basket (also Q&C).

Be sure to stop by the Stamping Bella blog today to see more previews of additional sets. And leave a comment there for your chance to win a prize!

I’ll be back tomorrow with more samples from the new release.  Thanks for stopping by!  🙂

1amichele siggy

Stamping Bella Previews – Oddball Graduate

Hi everyone! I’m back today sharing one more of the new Oddballs, coming to Stamping Bella June 25th!

Stamping Bella Oddball Boy Graduate Meet Oddball Boy Graduate. Of course, there is an Oddball Girl Graduate too.  🙂 If it weren’t for the actual excitement of being “done,” I believe this is what a lot of graduates would look like after all of those finals and projects.

Stamping Bella Oddball Boy Graduate (close-up)

Copic markers – B0000, B000, BG10, E000, E00, E01, E11, C00, C1, C2, C3, C5, C6, C7, C9, E31, E35, E37, Y21

To be honest, this is what *I* looked like after my son’s graduation and party. Exhausted.

Be sure to stop by the Stamping Bella blog today to see more previews of additional sets. And leave a comment there for your chance to win a prize!

I’ll be back tomorrow with more samples from the new release.  Thanks for stopping by!  🙂

1amichele siggy

Sparkle String and Rubber Bubbles (Queen & Company)

Hi everyone! Today I’m sharing two cards using Queen & Company ’s new Sparkle String and Rubber Bubbles. New Sparkle String is available in ten colors with Rubber Bubbles available in eight.  ALL FUN.


Hello-Rubber-500

I can’t get enough of Q&C’s Love Jar kit so stamping flowers was the first thing to pop into my mind.  I stamped some in the background and some on separate paper, cut out and then adhered those using a bit of foam tape. In the center of several flowers, I placed purple and yellow Rubber Bubbles.  I just love their vibrant color, and think they’re perfect as flower centers.


Hello-Rubber-500-CU

At the bottom of the stamped panel, I tied a bit of pink Sparkle String then stamped the sentiment (from Paper Smooches’ Scripty Sayings) in white ink then white embossed.

Supplies: Love Jar Shaker kit (stamps), Purple and Yellow Rubber Bubbles, Pink Sparkle String

Birthday-Sweet-Sparkle-String-500

Next, I created a bright lollipop using pink, green and white Sparkle String. I die-cut the lollipop stick using the lollipop die from the Candy Land Shaker kit.  I adhered a block of double-sided adhesive sheet to white card stock then die-cut a circle roughly the same size as the lollipop die. I removed the top release paper, revealing the sticky sheet, and beginning in the center, wound the three strings around to cover the circle. Once covered, I adhered the pop and stick to a panel of Picture Perfect paper.


Birthday-Sweet-500-CU

I tied a bit of white Sparkle String around the stick, stamped a sentiment from the Candy Land kit and added a few white Rubber Bubbles.

Supplies: Candy Land Shaker kit (sentiment and lollipop die), Picture Perfect paper pad, Pink, Green and White Sparkle String, White Rubber Bubbles

You can find all Sparkle String HERE and all Rubber Bubbles HERE.
Thanks so much for visiting today!

1amichele siggy

Stamping Bella Previews – Welcome the Oddballs

Hi everyone! I’ve been (so impatiently) awaiting the chance to share a new line coming to Stamping Bella. Meet the Oddballs!

BeFunky-collage-small-oddballsThey’re cute and quirky and I LOVE them! I have four to share today but you can pop on over to the Stamping Bella blog to see more! The new release will be available on Monday, June 25 (which is also the birthday of Emily, THE Stamping Bella).  🙂

All of my samples were stamped onto X-Press It Blending Card and colored with Copic markers.

First up is Oddball Birthday Queen.

Stamping Bella Oddball BIrthday Queen

This set includes the main image, a separate birthday cake image (which I did not use) and the sentiment.

Stamping Bella Oddball BIrthday Queen (close-up)

Copic markers – BG11, BV04, BV08, BV13, BV17, E000, E00, E01, E11, E13, E15, E18, E30, E31, E35, E50, E51, E53, G17, R89, RV17, RV19, RV32, RV69, W00, W1, W2, W3, Y21, YG06, YG17, YR23

There are two skulls on the birthday cake image, again, which I did not use here (in its entirety).  I stamped one of the skulls multiple times then cut out each and adhered over a banner die-cut (Taylored Expressions’ Skinny Mini Valentine Borders).  🙂

Next I have Oddball Nurse.  She’s one of my favorites of those I’ve seen so far.

Stamping Bella Oddball Nurse

I just love the look of exhaustion on her face. I’m sure all nurses can relate. (Bless them!)

Stamping Bella Oddball Nurse (close-up)

Copic markers – BG10, BG11, C00, C1, C2, 100, E000, E00, E01, E11, E31, E35, E37, E49, R20, R29, Y21

The little red crosses are from Taylored Expressions’ Little Bits Nurse Hat dies.

Next is Oddball with a Coffee. She represents sooo many of us. 🙂

Stamping Bella Oddball with a Coffee

I love the sentiment (and the bones).

Stamping Bella Oddball with a Coffee (close-up)

Copic markers – BG10, BG11, BG70, C00, C1, C2, E00, E01, E11, E13, E15, E18, E51, R01, R83, R85, R89, RV11, RV32, YG03, YG06, YG09, YG17, Kirarina Wink White Pearl pen

Sprinkled around her, I adhered some Epoxy Dots by Queen & Company.

And last but not least (for today, anyway), Oddball with a Martini.

Stamping Bella Oddball with a Martini

After coloring the image, I added a bit of pattern to her dress with a Copic Multiliner.

Stamping Bella Oddball with a Martini (close-up)

Copic markers – BG11, BG13, BG15, C00, C1, C2, C3, E00, E01, E11, E13, E15, E18, R01, R81, R83, R85, RV32, Y21, YG03, YG06, YG09, black Multiliner

Pretty Fruit Basket patterned paper and Epoxy Dots are by Queen & Company.

Be sure to stop by the Stamping Bella blog today to see more previews of additional sets. And leave a comment there for your chance to win a prize!

I’ll be back tomorrow with more samples from the new release.  Thanks for stopping by!  🙂

1amichele siggy

A HUGE Thank You (stamping bella)

Hi everyone! Welcome to another Bellarific Friday with Stamping Bella! This week we were to use an image in the same category (Bella 2.0) as our Stamp of the Month (All Boxed Up). I chose Flowers Behind My Back aBella.

Stamping Bella Flowers Behind my Back-abella

I stamped onto X-Press It Blending Card then colored with Copic markers. The dress portion of the image was stamped again onto patterned paper (from Doodlebug Design’s Hello 6×6 paper pad), cut out and adhered over the stamped image. Once adhered I added shadow using Copic grays and blue-greens.

Stamping Bella Flowers Behind my Back-abella (close-up)

Copic markers – BG10, BG11, BG13, BG15, BG18, 70, C00, C1, C2, E00, E01, E11, E31, E37, E35, E40, E42, E43, G17, R01, RV04, RV09, Y17, Y21, Y23, YG06, YG09, YR23

I layered the sentiment then stapled to the patterned paper, adding a small enamel heart shape embellishment.

NEXT WEEK – color challenge

Use colors in the photo below as inspiration.

32760944_1984462038261722_7476684544960102400_n

If you’d like, email your card to [email protected] by next Thursday to be featured on the SB blog. By doing so, you’ll also be entered to win some Bella Bucks! All challenge details can be found HERE.

Thanks so much for visiting today!

1amichele siggy