Monthly Archives: April 2008

Happy Birthday and …Santa? Is that you?

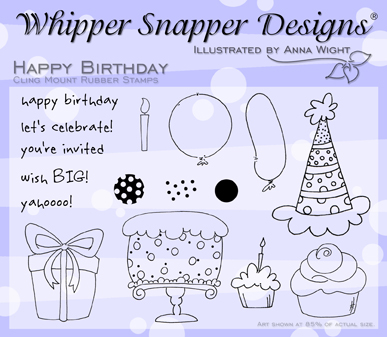
Hi!  Today I have samples from Anna Wight’s newest Whipper Snapper Designs release, Happy Birthday (available now).  I love this set as much as her last, Bundle of Joy!    🙂     
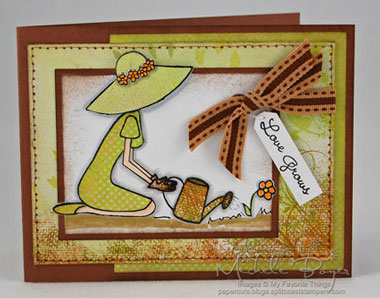
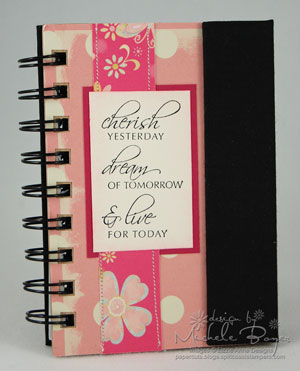
Wish Big

WBAWSP

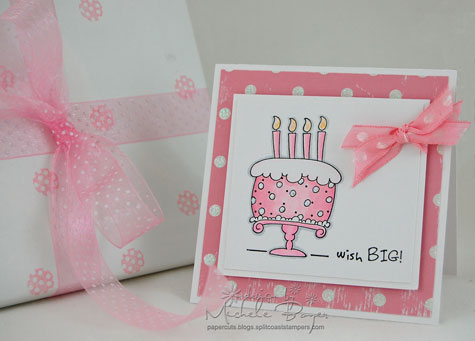
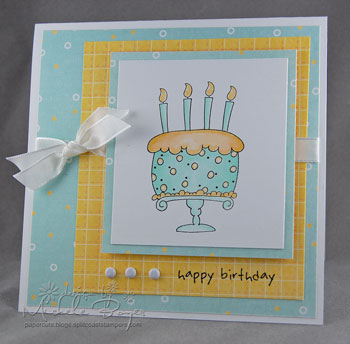
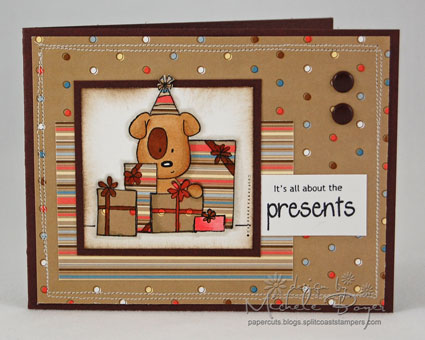
I made this card for one of my daughter’s friends (another lover of pink).  I colored the cake image with Copic markers, adding some sparkle with Stardust Stickles in the center of each white dot.  I matted the stamped image onto another block of white cardstock for the “faux nestabilities” look, and the matted image is raised on pop dots.  (Card size 4 1/4″ x 4 1/4″.) 

I wanted matching gift wrap so I used one of the bigger dots to stamp the white wrapping paper.  🙂
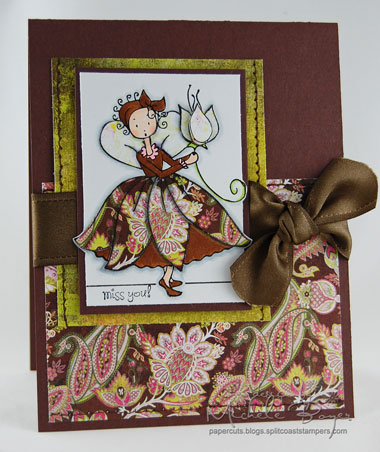
Let’s Celebrate!

HBCAWS

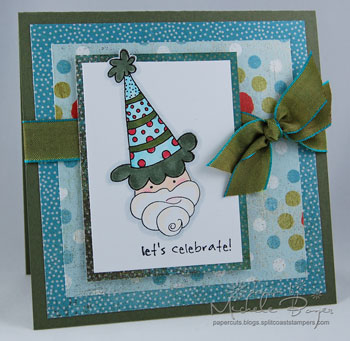
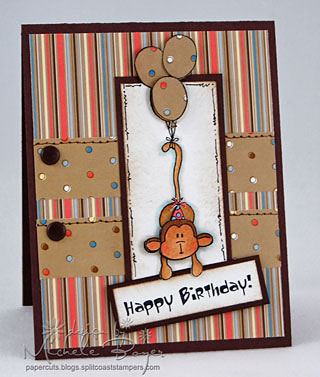
And here is my favorite of my cards (so far) using this set.  I can’t tell you how this popped into my head, but once I had the idea, I just *had* to make it work.  I stamped the hat at an angle and masked it off with a post-it note.  Then I used my Stamp-a-ma-jig to stamp the cupcake upside down.  I used a black marker to add a couple dots for eyes and a pink marker to add the rosy cheeks.  And there you have it! Santa!  🙂   (You can see the actual cupcake image in the photo below.)  I colored Santa and his hat with Copic markers.  The paper is from Basic Grey’s Dasher (blue Christmas theme).

Be sure to check out the other featured designers for more samples using this set:

            HBWSSetAnna Wight

            Meg Shumaker

            Shellie Daniel

            Yvette Ashe

            Valerie Stangle

Thanks so much for stopping by!  I have more samples I’ll be posting soon!  (One of them is another “out of the box” idea I had…just not as far out as the Santa! 🙂  Have a great day!

Sultry Eloise

Hi!  I hope you all had a great weekend!  The weather was SO nice here on Saturday…and yesterday we were wearing coats.  By the end of the week it will be back in the 70’s and everyone will be sick.  (Well, let’s hope not!)

Miss You!

MYSBE2

I took a bit of time to play with one of those Stamping Bella images Shannon made me buy. 😉  I *love* this image of Eloise from the Chichiboulie line.  I have a little list of a few more I’d like to eventually get.  I think they’re so cute.

I stamped Eloise onto the white cardstock, then I stamped her skirt onto the paisley pattern and the flower and her wings onto another, lighter pattern from Basic Grey Sultry (LOVE that paper).  Her skin, dress and scarf were colored with Copic markers.   After the pieces were assembled, I used gray Copics (one light and one dark) to add shading.  I used the lightest gray all the way around the image, then used the colorless blender pen to “smooth” the lines by going over them in tiny circles.  In the spots where I wanted a darker shadow (like on the paisley part of her skirt), I used both grays, again smoothing out the edges with the blender pen.  I try to use it a bit more sparingly when on patterned paper. 

The center piece of the flower is the only part that is popped up.

Thanks for stopping by!  Be sure to check back tomorrow!  I’ll have samples from Anna‘s NEWEST Whipper Snapper release!   🙂   Have a great day!

Cardstock:  SU Chocolate Chip, Papertrey Ink (white)   Patterned Paper:  Basic Gray Sultry paper pad   Stamps:  Stamping Bella “Eloise;” sentiment from “Billboardabella”   Ink:  Stazon Jet Black   Accessories:  Copic markers, SU black and Chocolate Chip markers, ribbon, pop dots, piercing template/needle.   Card size 4 ¼” x 5 ½”.

Hoot and Holler…An Eyelet Challenge

It’s time for another WT challenge at SCS. Today, Julia’s challenge is to use eyelets.  I thought and thought about what I could do that was different.  Since Kim Hughes’ U R A Hoot set from Cornish Heritage Farms was still on my table, I thought I’d use that.  I picked up these bigger Dritz eyelets from Michael’s a while back and I thought, hmmmm….I wonder if I can make a monocle for the wise old owl…or wise young owl graduating from college.

Hoot and Holler

              HHR1

I stamped the pieces onto vanilla cardstock, using Copic markers to color the owl.  I stamped the branch using black ink onto one of the papers from Basic Grey’s Recess paper pad, then added a bit of shading with a Copic marker before cutting it out.  I stamped the rest of that piece of Recess paper with the Paisley backgrounder and cut it at an angle to resemble part of  a tree.  (I don’t know if I achieved that look but that’s what I was trying to do.)

Before adhering the branch and owl pieces to the patterned paper, I stamped one of the  clocks from Time to Stamp using Mushroom Adirondack ink.  The cap is raised on pop dots, the monocle is adhered using Alene’s Paper Glaze. (I just “set” the eyelet with no paper, positioned it over the owl’s eye and filled the eyelet with the glaze.) Lastly, I added a bit of shading with a Copic marker.

Thanks for stopping by!!!  Have a great Thursday!

Cardstock:  Prism Crabapple Dark, Natural Smooth   Patterned Paper:  Basic Grey Recess  paper pad   Stamps:  Cornish Heritage Farms “U R A Hoot,” “Time to Stamp” and “Paisley” backgrounder   Ink: Brilliance Graphite Black, Stazon Jet Black, Ranger Corduroy Distress, Adirondack Mushroom    Accessories:  Dritz Antique Brass eyelets, Antique Brass brads, Aleene’s Paper Glaze, Copic markers, piercing template/needle, Chocolate Chip marker, pop dot.  Card size 5” x 5”.

Let’s Celebrate…wooHOO!

Hello!  I’ve had this set for a while now and I finally took the time to use it.  I needed a birthday card for one of my brothers and out of ALL the cards I have (and I have a LOT of cards), none were really right for him.

Let’s Celebrate

LCCHF2

I used U R A Hoot from the Kim Hughes Collection at Cornish Heritage Farms.  It’s basically an owl/graduation set, but there are birthday and even Christmas pieces too.  It’s a really fun set!  

You can’t see it here, but I lightly stamped the paper behind the owl with the Burlap backgrounder.  I stamped all the pieces onto vanilla cardstock, watercolored and then pieced together on the bluish solid “patterned” paper.  The puff on the hat and the owl’s claws are both raised on pop dots.  For some additional dimension, I only glued the owl’s body and then placed a little pop dot under each wing.  Once everything was together, I used a couple of gray Copic markers to add some shadow and depth.

The paper is from Basic Grey’s new Archaic paper pad.  (I got mine from Jacksonbelle Embellishments.)

Thanks so much for visiting!  Have a great Wednesday!

Cardstock:  SU Chocolate Chip, Very Vanilla   Patterned Paper: Basic Grey Arachaic   Stamps:  Cornish Heritage Farms “U R A Hoot” and “Burlap backgrounder”   Ink: Stazon Jet Black; Adirondack Espresso, Latte, Rust, Stonewashed   Accessories:  Piercing template/needle, Chocolate Chip marker, pop dots.  Card size 5” x 5”.

Sultry Frog In the Treetop

How’s that for a title? lol.  When I started making this card, I intended to use Basic Grey’s Mellow paper.  But then I got my order from Jacksonbelle Embellishments and I just *had* to use my new Sultry paper pad by Basic Grey.  And the green still matched!  I love when that happens! 

A Smile Sets it Straight

SC385I used three sets for this card, all by Lizzie Anne Designs.  The tree, ‘stitches’ and swirls on the green background are from In the Treetop, the sentiment is from Say it in Script and the frog is from LAD’s cute little princess set called Once Upon a Time.  Before stamping the frog, I masked off his crown.  (I didn’t need a smiley, princely frog…  just a smiley one.)

I used a Stamp-a-ma-jig to stamp the treetop and then to properly place the frog.  I also used the SAMJ for the stitches.

This was my first time using Adirondack inks and I must say I love how they watercolor.  The next time I’ll have to try coloring something bigger than a dime.

Thanks so much for stopping by!!  I hope you have a great Tuesday! 🙂

Cardstock:  SU Chocolate Chip, Papertrey Ink (white)   Patterned Paper:  Basic Grey Sultry 6 x 6 paper pad   Stamps:  Lizzie Anne Designs “In the Treetop,” “Say it in Script” and “Once Upon a Time”  Ink:  Adirondack Espresso and Meadow   Accessories:  Hero Arts Gemstones (2 mm), Cool Gray #1 Copic marker, Chocolate Chip SU marker, water brush, pop dots, Stamp-a-ma-jig.  Card size 5” x 5”.

Hey Chicky!

Good morning.     (lol)

I have a couple samples today using another new release by C.C. Designs from All That Scraps.  This set is called Hey Chicky and it consists of four chicks and the sentiment. 

Hey Chicky #1

HCUI used the new SEI Chick-A-Dee patterned paper and brads.  All the patterns in this line are so cute.  And what I like about the brads (besides the fact that they all match the paper) is that they are different shapes and sizes.

After stamping the two chicks onto the peachy paper, I stamped them again onto white cardstock, colored them with reinkers and then pieced them onto the peach paper.   The umbrella and boots were paper-pieced as well. 

I messed up a bit in stamping the first set of raindrops at that monsoon angle but I didn’t want to begin again.  So what these chicks are actually saying to each other is “Run! Run!”  

Hey Chicky #2

HCFFor some reason, I struggled a bit with this one.  I think it’s the white space around the chick that bothers me. 

I used the same SEI Chick-A-Dee paper and brads and attached a little pink Prima over the stamped flower.  The tiny yellow brad in the center is not from the SEI pack but from a Queen & Co. pack of sprinkle brads.

I used a scallop blade in my Fiskars Rotary trimmer for the scalloped edge.  And a tag corner punch made for an easy tag shape for the sentiment.  (No hole; the brad is just postioned over the end of the white cardstock.)

Thanks so much for stopping by!  I hope you all have a great Monday!

Birthday Wishes for a Friend

I made this card for a good friend whose birthday is next week.  (Of course, it will be late as I haven’t had a chance to mail it yet!!  Ack!  But I know she’ll understand.) 

BWLAD

I used In the Meadow and Say it in Script by Lizzie Anne Designs.  The paper is from a new line by Terri Conrad for Webster’s Pages called “Raspberry Truffle.”   I stamped the flowers onto the back of the Pokee Dot paper, masking as I went along.  I colored with SU reinkers then outlined and added some shadow with Copic markers.

Since my friend loves to stitch on her cards and since I am so inspired by that stitching, I thought I’d do a bit of my own.  I like how she mixes the stitch types, so I did that too.

I used a Copic to dye the ribbon to match the paper and attached it with a paperclip.  (Yes, she  uses those too.)

It seems like my friend already has just about everything related to paper crafting, so I thought I’d make a little something to send along with the card.  I’m sure everyone has CNBLAD2seen those wonderful little notebooks from Target.  I was browsing in there the other day and I noticed they have a new type (at least I’d never seen them) with a magnetic closure.  I like these better than the snaps, first of all because the paper edges are covered and secondly, there’s no pesky snap to be affected by covering the front with layers of paper.  So I picked up a couple.  I wanted the notebook to match the card so I used the same paper and my favorite quote from the Say it in Script set.   I hope this little book will come in handy.  I keep one in my purse as I never know when I’ll get an idea…and if I don’t jot it down as soon as I think of it, it’s gone just as quickly.

Happy birthday, my friend!  I *promise* to get these in the mail on Monday! 

Have a great day!! Thanks so much for stopping by! (Oh, and Lindsey has all the new Basic Grey!  Hurry on over and get some before it’s gone! It’s HOT!)

Thelma & Louise

Today’s Ways to Use It challenge at Splitcoast is to use rub-ons.  I’m embarassed to say I have so many I cannot fit them all onto the bottom of a Clip-it-Up (and those things hold a lot).  Rub-ons are great…if they work.  (Most do, but is it ever aggravating when they don’t!)  I used two of my favorite brands here…Doodlebug (stitches) and 7gypsies (Thelma & Louise from “Friends” rub-ons).

T&L2Not long ago, I was working on a little Stamping Bella order.  It was really quite small….then I saw Carole use this image…and Shannon used an adorable fairy image from the Chichiboulie line. (Matilda Muffinbread is next on my hit list!)  Then Emily released a Lattebella.  And of course I had to have Winobella.  Before I  knew it, my list had really grown. But that’s ok.  I love Stamping Bella.  (Now I just need time to use them all!)  I also added to my cart a couple of these adorable little flowers!  I thought they were paper, like Primas, but they’re actually a hard little plastic with a hole in the center for a brad or whatnot.  They are SO cute!  I only got pink and purple, but I’ll get more when I order Matilda.  🙂

The patterned paper is Daisy D’s “Sweet Baby Jane.”  You can find it at Jacksonbelle Embellishments.  (Very sweet patterns!)

Thanks so much for stopping by!!  Have a great Thursday!  

Cardstock:  SU Perfect Plum, Papertrey Ink (white)   Patterned Paper:  Daisy D’s “Sweet Baby Jane 8 x 8 paper pad   Stamps:  Stamping Bella “Best Friends Forevah”   Ink:  Brilliance Graphite Black   Accessories:  Rub-ons (Doodlebug Design, Inc. Sew Easy Black stitches; sentiment from 7gypsies “Friends”), Copic markers, black SU marker, “Lilac Daisy” from Stamping Bella, Queen & Co. white sprinkle brad, American Crafts eyelets, Crop-a-dile, pop dots.  Card size 4 ¼” x 5 ½”.

It’s my birthday!

Sorry for the double post today.  I have a lot of new releases this week and it’s getting tough to juggle.

It’s not really my birthday…that’s the name of this new set by C.C. Designs, one of five new releases available Friday, April 4th from All That Scraps.  Of all of them, I think this one is my favorite.

It’s all about the Presents
PubFor this one, I paper-pieced most of the gifts and Lucky’s hat and colored Lucky with Copics.  I think he’s cute buried in all the gifts!

Cardstock:  SU Chocolate Chip, CC Designs white    Patterned Paper:  Pebbles, Inc. Travel Dot and Travel Stripe   Stamps: CC Designs “It’s my Birthday”   Ink:  Brilliance Graphite Black, Ranger Walnut Distress   Accessories: Copic markers, American Crafts medium Chestnut brads, black SU marker, sewing machine/thread, pop dots, sponge.  Card size 5 ½”x 4 ¼”.

.

Happy Birthday!

HBMR2I colored this little monkey with Copics and paper-pieced the balloons and his hat.  When trimming the image, I allowed the balloon to extend past the border, then added the extra two, raising all three on pop dots.  The monkey’s head and hat are popped up as well.

I used a craft knife to carefully cut around the bottoms of his hands so I could tuck the sentiment beneath them.  There are pop dots under the birthday sign too.

Thanks for stopping by!  Have a great day! 🙂

Cardstock:  SU Chocolate Chip, CC Designs white  Patterned Paper:  Pebbles, Inc. Travel Dot and Travel Stripe   Stamps: CC Designs “It’s my Birthday”   Ink:  Brilliance Graphite Black, Ranger Walnut Distress   Accessories: Copic markers, American Crafts medium Chestnut brads, black SU marker, piercing template/needle, Chocolate Chip marker, pop dots, sponge.  Card size 4 ¼” x 5 1/2″.

Can ya dig it?

Happy Wednesday!!  I have a couple samples today using My Favorite Things‘ second new release, Can Ya Dig It.

Planting Veggies

CYDI380

I didn’t pull this off as well as I had hoped (you know…vision in the head doesn’t always translate as well to paper), but I tried!  I used one of the background stamps from MFT’s Behind the Scenes for the garden rows.  Yes, I cut out all those little plants.   I question my own sanity all the time so it’s totally ok to shake your head.  After adhering the little plants, I used a brown marker to add a little mound of dirt at the base of each stem.  Then I outlined a bit with two different gray Copics to add some shadow and depth.

Cardstock:  SU Garden Green, Very Vanilla   Patterned Paper:  American Traditional Designs Recipe Time “Veggies”   Stamps: My Favorite Things “Can Ya Dig It” and “Behind the Scenes”  Ink:  Ranger Walnut Distress, SU Garden Green, Stazon Jet Black   Accessories: Twill, Karen Foster Gardening charms, SU markers, Copic gray markers, sponge, sewing machine/thread, pop dots.  Card size 5 ½”x 4 ¼”.
Love Grows
LG2

There isn’t really a lot to say about this one.  I paper-pieced.  (Shocking, I know. 🙂 )  The hat is raised on  pop dots and…I think that’s about it.

Don’t forget about the release party tonight from 9-11 est in MFT’s Member Company forum at Splitcoast!

Thanks for stopping!  Have a great day!

Cardstock:  Bazzill Carob Cream Smoothies, Papertrey Ink (white)   Patterned Paper:  Memory Box Sprouts   Stamps: My Favorite Things “Can Ya Dig It”   Ink:  Brilliance Graphite Black   Accessories: Ribbon piercing template/needle, Chocolate Chip marker, Copic markers, American Crafts eyelet, Crop-a-dile, pop dots, sponge.  Card size 5 ½”x 4 ¼”.