
I can’t seem to tear myself away from these sweet little girls by Digi Stamp Characters. My friend, Jody, and I both purchased this image (among others…she blames me) and so we thought it might be fun if we both posted our cards on the same day.
You are Appreciated

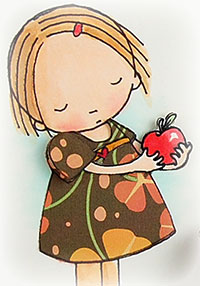
My little apple girl is colored with Copic markers, her dress and arms/apple were paper-pieced and the grass was colored/drawn in with Prismacolor pencils.
 Some of you had some questions about using digi-images so I’ll try to answer them as best I can. I’m no expert but I can share with you what I have and do.
My printer is a Canon MP240 Inkjet. It was not expensive and I bought it with a rebate so it was a good deal.
Copic markers work fabulously with the ink. I’ve had no bleeding whatsoever… unless I use too much marker ink. ![]()
I’ve had no problems running cardstock through my printer. The paper does not travel/wrap around a bar of any kind so the paper comes out as flat as it went in.
It’s really easy to paper-piece digi-images:
First decide how many different parts you will need. I needed one for the main image, a second for her popped up sleeve, a third for her dress and a fourth for her right arm, apple and dress band. So I printed four images onto one sheet of cardstock. I left a little extra room around the first one which is the one I used for the card. The others were printed close together since I only needed parts from each one.
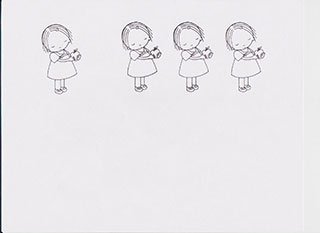
After printing, I returned to my computer and deleted the first and fourth images. Doing so prevents the printer from printing over these images a second time. Remember, the first is the main image and the fourth I used for her arm, apple and dress band.
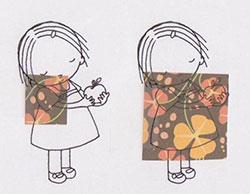
Using removable tape, I adhered small pieces of patterned paper over the area I wanted printed (the sleeve on the second image and the dress on the third). Be sure to place the tape on the side of the patterned paper that will go into the printer first.

Here’s a close-up of the two images after printing a second time:
 I then cut out the parts I needed and began putting her back together.
I hope that was helpful. I’d be happy to answer any other questions. Just let me know! 🙂
Don’t forget to stop by JODY‘s blog to see her apple digi-girl! I can’t wait to see for myself as she is a super-fantabulously talented gal! (I’ll be pairing up with friends and images often as I’m on a mission to use my neglected supplies. And everything is more fun with a friend.) 🙂
Thanks for stopping by! Have a great day!
Digi-image: Digi Stamp Characters Sentiment: Cornish Heritage Farms “Making the Grade” (Kim Hughes Collection) Ink: Memento Tuxedo Black Cardstock: Prism Suede Brown Dark, Natural Smooth Patterned Paper: Cosmo Cricket “The Boyfriend” and “Earth Love” available here or here Accessories: Copic markers (E000, E00, E57, R20, YR20, YR23, R12, R14, G21, B0000), Prismacolor pencils/turpenoid, Stampin’ Up chocolate grosgrain, Basic Grey button, Bow Easy, natural jute string, clear embossing powder (sentiment). Finished size 5” x 5”.


Pingback: Paper Cuts » A Double Dipper Pumpkin Girl
Pingback: Digi stamp techniques-paper piecing by Michele — V's Sweet Ideas